Thursday, May 9, 2013

It's a Crochet Bow Tie - I Crochet Bow Ties Now - Bow Ties Are Cool!


I spent about an hour looking for crochet bow tie patterns online and found none that I liked. Every pattern I could find used yarn and I really don't like the way they look in the end. So at the end of the hour, I decided to write up a pattern of my own using thread instead for a more tight and classy look.


Materials:
Size 10 Crochet Thread (See below for type) 
Size 7 / 1.65mm crochet hook
Needle for weaving in ends
Starch (If you want to starch the ends. I recommend it.)

I have had several questions about the type of thread used for this pattern. The "thread" needed is NOT the kind you would use for sewing or embroidering. You need crochet thread. This is the kind of thread you will usually see used to crochet doilies or lace-type tablecloths. I usually use the Red Heart Classic Crochet Thread you can find at nearly any Walmart (as my town lacks anywhere else to buy yarn, thread, etc.). You can usually find it close to where most stores stock their yarn. At Walmart it is usually on the same isle as the yarn. In other stores like, Hobby Lobby or Joann's, they usually stock it on the end of an isle. No matter what brand you end up buying, they will all look similar to the pic below.

Terms:
·         Decrease Row: Ch 1, turn, sc 2 tog, sc in next st and in each st across
·         Increase Row: Ch 1, turn, 2 sc in first st, sc in next st and in each st across


Pattern: [Main pattern makes a large "Bow" when tied. For a smaller sized "Bow" use stitch numbers inside ( ) In rows where you do increases and decreases, you will end up doing 5 less rows then the pattern says for the smaller sized "Bow" ]


1.                                           Ch 21(16), turn sc in 2nd ch from hook and in each ch across. (20 (15) sts)

2-4.                  Ch 1, turn, sc in each st across.

5-19.                Decreased rows. (Last row will have 5 sts.)

20.                   Ch 1, turn, sc in each st across.

21-35.              Increase Rows (Last row will have 20 (15) sts.)

36-43.              Ch 1, turn, sc in each st across.

44-58.              Decrease rows. (Last row will have 5 sts.)

59-203.            Ch 1, turn, sc in each st across. (If you need this bow tie to fit larger or smaller neck sizes, simply add or leave off rows from this section)

204-217.          Increase rows (Last row will have 20 (15) sts.)

218-225.          Ch 1, turn, sc in each st across.

226-240.          Decrease rows (last row will have 5 sts)

241-242.          Ch 1, turn, sc in each st across.

243-257.          Increase Rows (last row will have 20 (15) sts)

258-261.          Ch 1, turn, sc in each st across.

262.                 Without turning, sc in each st around the outside of bow tie. Join with a sl st to first st of previous row. Fasten off and weave in ends.


It is a good idea to starch the ends of the bow tie to get it to stand up right when you tie it. If you do not starch it, it has a softer, floppy sort of look and the ends will curl over on themselves a bit. 

This pattern works up fairly quickly considering the small size of thread. I think it took me about 2.5 hours and that was with me typing out the pattern as I went.

Have fun with this one! This pattern can easily be adapted to use more than one color. (stripes, outside border a different color, etc.) I would love to hear how the pattern works for you and as always feel free to comment with any questions you have. 

Stormi

Saturday, May 4, 2013

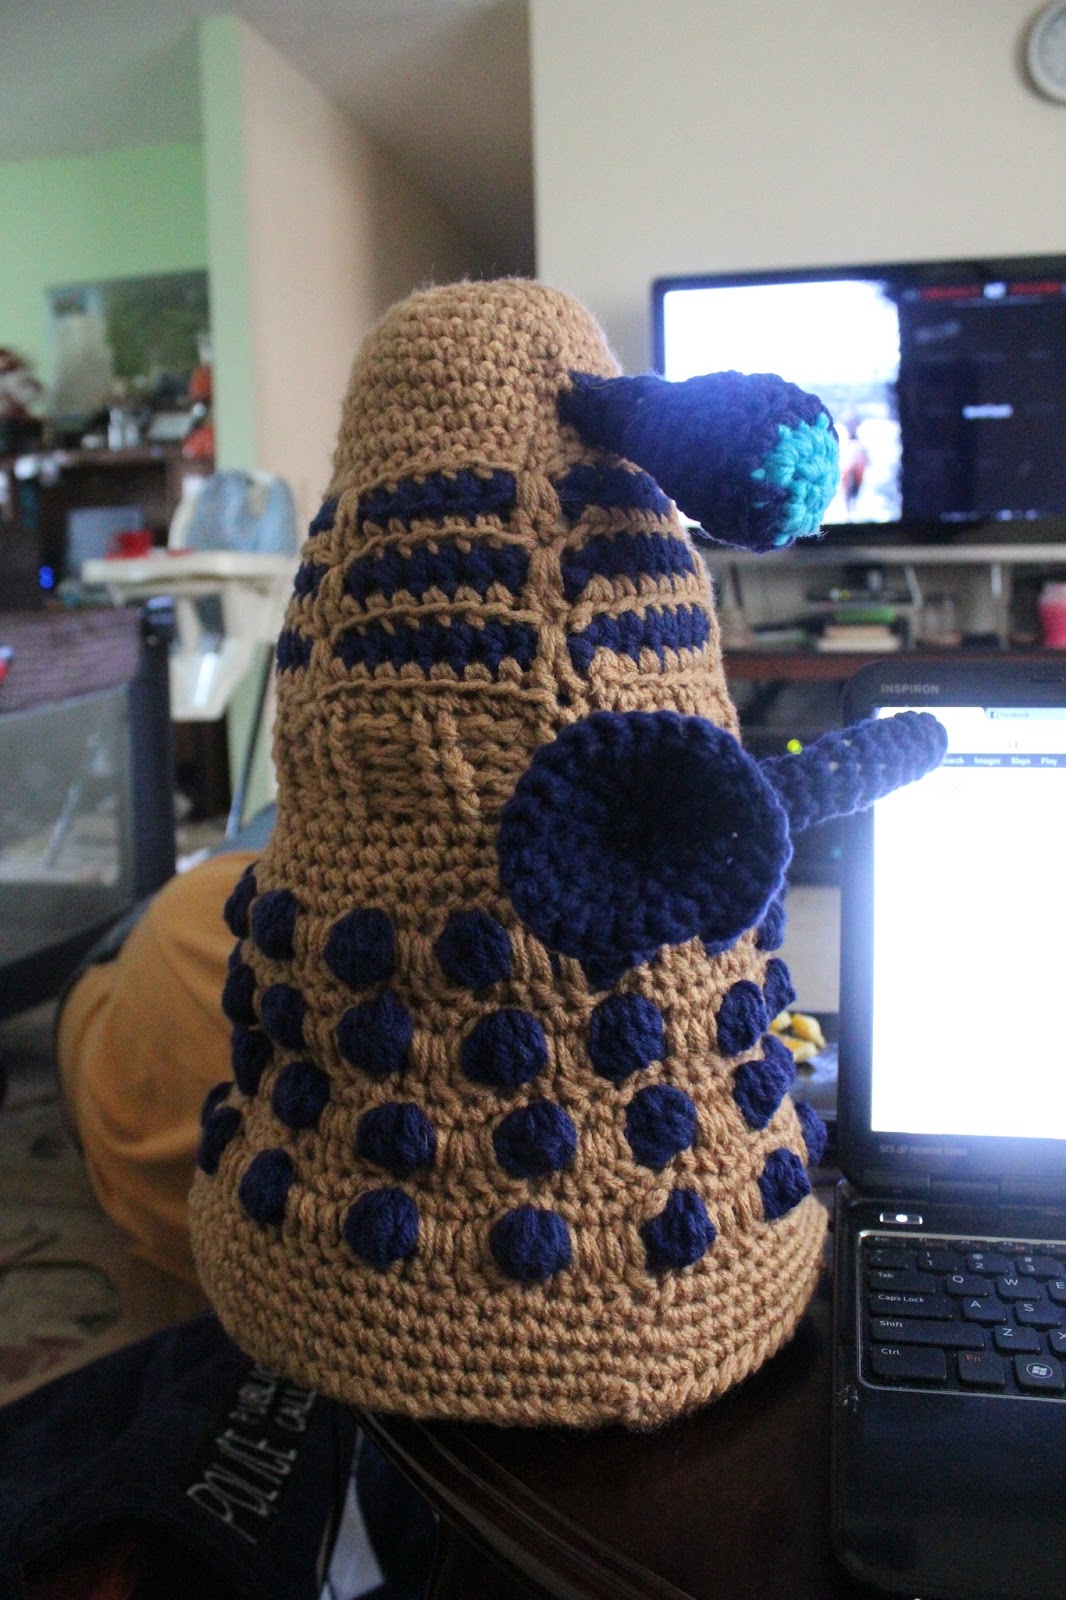
Crochet Doctor Who Inspired "Dalek" Pattern


Lately I've been in a bit of a crochet rut. So for the past few days I've been spending my time surfing the web and checking out tons of free patterns trying to find one that really inspired me. 

I've been getting more into Amigurumi style crochet projects. I haven't really done very many of these types of patterns. My Crochet Amigurumi Voodoo Doll  was the first major Amigurumi pattern that I worked on. I wanted something to inspire me like the Voodoo doll idea had but I hadn't been able to find anything until a friend showed me one that she was getting ready to start.

The pattern she showed me was for a crochet Dalek. (click link for original pattern. Link also includes a chance to help out a needy family via the poster of the original pattern.) 

I LOVED IT!  It looks great but wasn't exactly what I wanted. The original pattern is a bit smaller than I wanted and calls for joins at the end of each row. I wanted something large and worked in continuous rounds so there is no seam line.

I decided to work the pattern using two strands of yarn and a J hook instead of the single strand and F that the pattern calls for. While the pattern was done well for the most part, it is a bit difficult to understand at times, there was a whole row I had to leave out to make it look right and another I had to change to make it look right as well. I also didn't like that the "arms" and "eye" were flat instead of round. I got about halfway through the pattern before I decided to pull it out and write up my own pattern inspired by the original one my friend showed me. 

I designed a pattern to better fit using two strands and a larger hook size. I also added another color and changed a few of the rows to enhance the overall look of the Dalek. Then I added instructions for making the "eye" and "arms" round instead of flat and added instructions for making the "lights" for the top of the Dalek.

This was a super fun project to work on and it was made even better by the reaction of my daughter when she saw it. ("I LOVE DALEKS!")
She is currently running around my house with it yelling "EX-TER-ME-NATE!

So, here is is. Enjoy!


Crochet Dalek Pattern


Hook Size: US J / 6.00MM

2 Strands of Worsted Weight Yarn in color A (I used Red Heart acrylic yarn for this project but I think it would work well in cotton as well.) For A I used a caramel color.

2 Strands of Worsted Weight Yarn in color B. For B I used a Navy color.

2 Strands of Worsted Weight Yarn in color C. For C I used a scrap of a bright blue color.

Poly Fill

Yarn Needles

Stitch Markers

This pattern is worked in continuous rounds using a stitch marker to keep track of where the row ends. Make sure you place the stitch marker in the last stitch of the row and make sure you move it up with each row so you can keep track of where you last stitch is.

Body:

1.) Start with color A. Using "Magic Circle" technique start with 12 sc into Magic Circle.

2.) sc in next st, 2 sc in next st around (18 sts)

3.) sc in next 2 sts, 2sc in next st around (24 sts)

4.) sc in next 3 sts, 2sc in next st around (30 sts)

5.) sc in next 4 sts, 2sc in next st around (36 sts)

6-12.) sc in each st around.

13.) Change to color B. Sl st into back loop only of first st of row. (st you sl st into at the end of previous row.) hdc into back loop only of  same st and next 4 st, ch 1, sk 1 st, *hdc in back loop only of next 5 st, ch 1, sk 1 st* around.

14.) Change to color A. Sl st into first st of previous row. (st you joined to) *sc in  next 5 st, 2dc in both loops skipped st of previous row* around.  Join with a sl st to first st of row, fasten off. (42 sts)

15.) Change to color B. Sl st into back loop only of  first st of previous row. (st you joined to) *hdc into next 6 st, ch 1, sk 1 st* around. Join with a sl st to first st of row, fasten off.

16.) Change to color A. Sl st into first st of previous row. (st you joined to) *sc in next 6 st, 2 dc in both loops of previous row* around. Join with a sl st to first st of row. Fasten off. (48 sts.)

17.) Change to color B. Sl st into back loop only of first st of previous row. (st you joined to). *hdc in next 7 st, ch 1, sk 1 st* around. Join with a sl st to the first st of the row.

18.) Change to color A. Sl st into first st of previous row. (st you joined to) *sc in next 7 st, 2dc in both loops of skipped st of previous row* around. DO NOT JOIN place Stitch Marker in last st of row. (54 sts)

19.) *Sc in back loop only of next 8 st., sc in next st* around

20-23.) *fpsc (front post single crochet) in next to st, bpsc (back post single crochet) in the next to st.* around.

24-26.) sc in each st around.

27.) *sc in next 8 st, 2 sc in next* around. (60 sts) sl st into next st and fasten off.

28.) Change to color B. Sl st into first st of previous row. (st you sl stitched into). *Pc in next st, ch 3, sk 3 sts* around. Join with a sl st and fasten off.

29.) Change to color A. Sl st into first st of row. (st you joined to.) *Sc in top of Pc, Dc in next 3 st of previous row* around. Join with a sl st.

30-31.) Ch 1, sc in each st around. Join with a sl st and fasten off after row 32.

32.) Repeat row 29

33.) Repeat row 30

34-35.) Repeat row 31-32

36.) Repeat row 29

37.) Change to color A. Sl st into first st of row. (st you sl stitched into) * sc in top of Pc, dc in next st of previous row, 2 dc in next st of previous row, dc in next st of previous row.* around. Join with a sl st. (75 sts)

38-39.) Ch 1, sc in each st around. Join with a sl st and fasten off.

40.) Change to color B. Sl into first st of row. (st you sl stitched into) *Pc in next st, ch 4, sk 4 sts* around. Join with a sl st and fasten off.

41.) Change to color A. Sl st into first st of row. (st you sl stitched into) * sc in top of Pc, dc in next 4 sts of previous row.* around. join with a sl st.

42-43.) Ch 1, sc in each st around, Join with a sl st AFTER ROW 44 DO NOT JOIN! Place stitch marker in last st of row.

44.) *2 sc in next st, sc in next 14* st around. ( 80sts)

45.) *2 sc in next st, sc in next 15* around (85 sts)

46.) sc in each st around, sl st into next st and fasten off leaving about a yard of yarn to sew on the base.


Base:  ( Use color A)

1.) Using magic ring technique, start with 6 sc in magic ring. Place stitch marker in last sc of row.

2.) 2 sc in each sc around. (12 sts.) Make sure you are moving the stitch marker with each new row.

3.) *2 sc in next st, sc in next st* around (18 sts)

4.) *2 sc in next st, sc in next 2 sts* around (24 sts)

5.) *2 sc in next st, sc in next 3 sts* around (30 sts)

6.) *2 sc in next st, sc in next 4 sts* around (36 sts)

7.) *2 sc in next st, sc in next 5 sts* around (42 sts)

8.) *2 sc in next st, sc in next 6 sts * around (48 sts)

9.) *2 sc in next st, sc in next 7 sts*  around (54 sts)

10.) *2 sc in next st, sc in next 8 sts* around (60 sts)

11.) *2 sc in next st, sc in next 9 sts* around (66 sts)

12.) *2 sc in next st, sc in next 10 sts* around (72 sts)

13.) *2 sc in next st, sc in next 11 sts* around (78 sts)

14.) *2 sc in next st, sc in next 12 sts* around (84 sts) sl st in next st and fasten off.

Eye: (When assembeling, eye should be attatched at row 10 of body.)


1.) Using color C and the magic ring technique start with 6 sc in magic ring DO NOT JOIN place stitch marker in last st of row and move it with each following row.

2.) 2sc in each st around (12sts) sl st into next st and fasten off

3.) Using color B sl st into first st of previous row (st you ls st into) *2sc in next st, sc in next st* around (18 sts)

4.) *sc in back loop only of the next st* around

5.) sc in each st around

6.) *sc 2tog, sc in next st* around (12 sts)

7.) *sc 2 tog* around (6 sts)

8-12.) sc in each st around. at the end of row 12 sl st into next st and fasten off leaving enough yarn attached to sew on eye.

"Gun" Arm: (Arms are attached to the body just below the ribbed section and just above the section with the "balls")


1.) Ch 2, 3 sc in 2nd st from hook. Place stitch marker

2.) 2 Sc in each st around (6sts)

3-12.) sc in each st around. Sl st into next st and fasten off leaving enough yarn attached to sew on arm.

"Plunger" Arm: (Arms are attached to the body just below the ribbed section and just above the section with the "balls")


Follow instructions for rows 1-7 of the "Gun" Arm, sl st into next st and fasten off leaving enough yarn to sew on arm.

1.) Sl St into row two and work 6 sl stitches around the end of arm. Place stitch marker in last st

2.) 2 sc in each st around (12 sts)

3.) *2sc in next st, sc in next st* around (18 sts)

4-10.) *2sc in next st, sc in next 2 sts* around (24 sts) Sl st into next st and fasten off. Weave in loose ends and attach to body.

11.) Using sl st, attach to to row 2 of "arm" you just made and work 6 slip stitches around the end of the arm. place st marker.

12.) *2 sc in each st* around. (12 sts)

13.) *2 sc in next st, sc in next st* around (18 sts)

14.) * 2 sc in next st, sc in next 2 sts* around (24 sts) sl st into next st, fasten off and weave in loose end.


"Lights": Make 2 (As I originally forgot about them, the "lights" are not shown in the pics. Lights are attached at the top of the Dalek's "head" with one being to each side of the "eye" and a little farther back. [almost like horns or antlers.])

1.) Using color B (or white if you like) and magic circle technique, Start with 6 sc in magic circle. Place stitch marker.

2.) *2 sc in each st* around (12 sts)

3.) *sc in back loop only of next st* around

4-7.) sc in each st around. Sl st into next st, fasten off  leaving enough yarn to attach to body.

Now all you have to do is stuff (stuff firmly!)  all the parts and assemble! I cut a cardboard circle the same size as the base and sewed in after I stuffed the body to give it a flat bottom and help the whole thing stand better.

Finished project stands approx. 17 inches tall and is approx. 10 inches wide at the base.

Have fun with this one and I would love to hear what you think about the pattern.

Stormi

Edit: I added the pattern for the "lights" (not pictured) and added the missing part of the "plunger" arm pattern.


Edit 2: There was a mistake in the main body pattern. Fixed now!

Wednesday, March 20, 2013

Crochet Amigurumi VooDoo Doll

Finished doll is aprox. 2' tall.

Have fun with this one and really experiment with how you put it together and the colors and buttons you use. I can't find a picture of it right now, but I made one that was dark blue with neon blue stitches and eyes. They eyes were two different sizes and it turned out awesomely cute!


IMPORTANT!!!: This entire project is worked in the round. DO NOT join at the end of rounds. Use a stitch marker! Place it in the last stitch of the first round and move it to the last stitch of each round as you go. 

Materials:
Yarn needle
2 buttons (they can be the same size and color or different.)
Main body color yarn (approx half a skein)
"Stitch" color (whatever odd ends you have will work.)
I used a G hook for the doll pictured. I've also used one size larger and one size smaller. Each worked just 
as well but keep in mind when changing hook sizes that larger hooks result in larger stitches and you will be
able to see the fill a little more especially with dark colored yarn.

Legs: 

1. 10 Sc in Magic ring 

2. 2 sc in each st around. 

3. 1 sc in next, 2 sc in next around 

4. 1 sc in next 2, 2 sc in next around 

5. sc in back loop only around 

6-8. sc in each st around 

9. 1 sc in next 2, sc 2tog around. 

10. 1 sc in next, sc 2tog around. 

11-17. 1 sc in each st around. Stuff foot. 

18. 1 sc in next, sc 2tog around 

19-28. 1 sc in each st around. Fasten off and stuff leg. 

 
Arms: 

1. 10 sc in magic ring 

2. 2 sc in each st around. 

3. 1 sc in next, 2 sc in next around 

4. Sc in back loop only around.  

6-8. Sc in each st around 

9-10. 1 sc in next, sc 2tog around. 

11-17. sc in each st around. Stuff arm 

17. 1 sc in next, sc 2tog around.  

18-25  1 sc in each st around. Fasten off and stuff arm. 
 
(Quik note about sewing on the "stitches" I always sew them on after I have the doll together so that they
do not pull as much when you stuff it but you may find it easier to do them before stuffing.)
Head (head was written up from memory so please let me know if I need to tweak anything.)

1. 10 Sc in Magic ring 

2. 2 sc in each st around. 

3. 1 sc in next, 2 sc in next around 

4. 1 sc in next 2, 2 sc in next around 

5. 1 sc in next 3, 2 sc in next around

6. 1 sc in next 4, 2 sc in next around

7. 1 sc in next 5, 2 sc in next around

8. 1 sc in next 6, 2 sc in next around

9-11. sc around

12-15 decrease rows 

stuff first half of head and sew on eyes.

16-17 decrease rows

18-20 sc around

stuff second half of head. (head will round out more the more you stuff it.


Body:

Rnd 1 – "Magic Loop" 7 sc in magic loop

Rnd 2 – 2 sc in each sc to marker, 2 sc in marked st, place marker in last sc made
(14 sc)
Rnd 3 – [sc in next sc, 2 sc in next sc] repeat around to sc before marker, sc, 2 sc in
marked sc (21 sc)
Rnd 4 – [sc in next 2 sc, 2 sc in next sc] around to 2 sc before marker, sc in next 2 sc, 2
sc in marked sc (28 sc)
Rnd 5 – [sc in next 3 sc, 2 sc in next sc] around to 3 sc before marker, sc in next 3, 2 sc
in marked sc (34 sc)
Rnd 6 – [sc in next 4 sc, 2 sc in next sc] around to 4 sc before marker, sc in next 4, 2 sc
in marked sc (41 sc)
Rnds 7 - 12 – sc evenly around, moving up marker to last sc of each round (41 sc)
Rnd 13 – [sc in next 5 sc, 2 sc in next sc] around to 5 sc before marker, sc in next 5, 2
sc in marked sc (48 sc)
Rnd 14 - 26 – sc evenly around, moving marker to last sc of each round (48 sc)

Rnd 27 – [sc in next 5 sc, dec. over next 2 sc] around to 6 sc before marker, sc in next
5, dec. over next sc and marked sc, (41 sts)
Rnd 28 – [sc in next 4 sc, dec. over next 2 sts] around to 5 sc before marker, sc in next
4, dec. over next sc and marked st (34 sts)
Rnd 29 – sc evenly around, moving up marker to last sc of each round (34 sc)

Rnd 30 – [sc in next 3 sc, dec. over next 2 sts] around to 4 sc before marker. Dec. in
next sc and marked st (28 sts)
Stuff firmly
Rnd 31 – [sc in next 2 sc, dec. over next 2 sts] around to 3 sc before marker, dec. over
next sc and marked st (21)
Rnd 31 – [sc in next sc, dec. over next 2 sts] around to 2 sc before marker, dec. over
next sc and marked st (14 sts)
Rnd 32 – dec. over next 2 st around, cut leaving long tail.

Weave tail through last row and pull tight and secure tightly to close end.

All that is left now is to sew the doll together. Use a yarn needle and the same color yarn as your main doll
body. The doll pictured is sewn together pretty evenly but it is also fun to experiment with sewing one of the arms lower than the other. You can also play around with adjusting the length of arms and legs if you want a more "Frankenstein" kind of look to yours.


EDIT: I am currently working on a giant, semi-life size version of this pattern. it will be posted when I am
done making the first one and writing up a pattern for it. Make sure you check back soon if you would like
see the giant pattern.

Tuesday, December 4, 2012

Doctor Who! - Fourth Doctor's Scarf Crochet Pattern

As a HUGE Doctor Who fan, I wanted to make my own version of the iconic scarf worn by Tom Baker as the Fourth Doctor. My first step in making my pattern was to check out some of the others posted online. The best and , by far, most informative page I came across was Doctor Who Scarf .com The page gives background info on the scarf throughout its run on the show, suggestions for yarn brand and color, and several patterns depending on which version of the scarf you want to make and the type of yarn you want to use.

HOWEVER the patterns are all for the original knit version. Don't get me wrong, I love the look and feel of a knitted scarf. The problem is me. I've been crocheting from a very young age and only started really learning to knit very recently. I can handle a scarf as long as it is all one color. I originally started trying to knit this scarf but (as this was the first time I have been required to change colors when knitting) I didn't like how the edges were looking in the color change rows.

So, using the graph pattern from doctorwhoscarf.com I came up with my own pattern for this scarf in crochet instead.

(This is the semi-finished version of my scarf. This isn't really a good picture of it. The length of the scarf and the low light in my living room made it rather difficult to get a good picture.)

I would recommend checking out their great sight for brand and color suggestions before you start. All the yarn I used is Red Heart brand from Walmart. While I am happy with most of the colors, the red in my scarf is a little off. It needs to be a little brighter and more like the color of rust.

ALSO: When choosing your yarn for this pattern (ESPECIALLY IF YOU ARE KNITTING!) It is a good idea to get all your colors from the same type and brand. That said, it is more important to make sure all your yarn is the same texture and thickness. During the brief time I spent trying to knit this scarf, I discovered that the red yarn was a bit more coarse and slightly thicker than the rest of my yarn. This lead to the red parts of the scarf bulging out on the sides even though I used the same size needles.

As you can see in this photo, the strip of red seems to have more stitches in it. It doesn't. The yarn is thicker than the rest of the colors so it bulges out on the sides. Now, this really isn't a huge deal, but I am a perfectionist when crocheting/knitting and really want the sides of my scarf to be even the whole way. To fix this problem in my crochet version, when I crochet the red stripes, I used a hook that was smaller than the one I used for the rest of the colors. If you run into this problem as well, try one or two sizes smaller to get the stitches the same size as the colors before them. I did most of the scarf with an I/9-5.50MM hook and for the red stripes, I changed to a G/6-4.25MM Hook.

Okay, lets talk about the pattern now.This is a link to the knit pattern I worked off of to create my crochet version. The pattern in the link shows the color pattern and the stripe sizes in inches.

For the crochet pattern, I first started to work in Sc but I did not like how stiff it made the scarf and personally I like how it looks more than Sc. If you like the look of Sc, simply swap out the Dc in the pattern for Sc and do twice as many rows than the pattern says.

Below, is the full crochet version of the pattern. I hope you enjoy it.

Pattern:

Hook: I/9-5.50MM

Starting with the plum color, ch 37, dc in 3nd ch from hook and in every ch across. (35sc)
Fasten off

For the rest of the pattern, using the color stated, join in 1st Dc on next row, ch 2, and Dc across for stated number of rows.

Light Tan: 11

Light Caramel: 2

Mustard Yellow: 1

Rust Red: 4

Plum: 1

Charcoal Gray: 8

Army Green: 4

Yellow: 1

Tan: 4

Red: 2

Caramel: 1

Plum: 1

Green: 9

Yellow: 1

Gray: 4

Red: 1

Tan: 11

Plum: 1

Green: 4

Gray: 2

Yellow: 1

Red: 4

Plum: 1

Caramel: 7

Tan: 1

Gray: 1

Red: 8

Yellow: 2

Green: 4

Plum: 1

Tan: 8

Caramel: 1

Gray: 3

Red: 1

Plum: 2

Tan: 1

Yellow: 2

Green: 12

Red: 2

Gray: 2

 Yellow: 1

Caramel: 3

Plum: 1

Tan: 1

Gray: 6

Red: 1

Yellow: 2

Tan: 2

Plum: 1

Caramel: 5

Red: 1

Plum: 6

Fasten off and weave in all loose ends.

It's up to you how many tassels you want to add to the ends. At first, I placed 12 with 2 stitches between each one. I think on one end I had three between the last two but you can't really tell by just looking at the scarf.

To make a tassel, cut a 6" strip of each color of yarn.

Put all the strips together (making sure you line up the ends to make sure they are even) and fold in half.

Insert your hook into the stitch you want the tassel to go through, grab the loop end of the strips and pull through the stitch. (DO NOT PULL ALL THE WAY THROUGH. You want a loop on one side of the scarf and the cut ends on the other.)

Pull the cut ends of the strips through the looped end and pull tight.

*When making more than one tassel, make sure you are inserting your hook into the same side of the scarf so all of the knots end up facing the same way.

While it's not true to the original, I also like the look of smaller tassels. Instead of doing the bunches, I cut 5 strips of each color for each end of the scarf and put one through each stitch. This spreads the tassels across the entire end of the scarf. I like the even look to this type of ending but if you want to be more true to the original, stick with the first type of tassels.

(In the end, I decided to go with the more spread out version. This is what it should look like when you are done. I wouldn't choose yarn colors by this photo, the flash on my camera made them look a little weird)

I modified my finished scarf slightly from this pattern. After adding my tassels, I decided to take advantage of the considerable length and width of this scarf and turn it into a hooded scarf. To do this, I simply folded the scarf in half and stitched a seam about one foot long down one side. I LOVE THIS AS A HOODED SCARF! It looks really beautiful, but I can't get a good enough photo of it in a mirror, so you're going to have to wait to see it until I can get my husband to take a good photo of me wearing it.

This was a project that I really enjoyed working on as it combined two of my favorite things; crocheting and Doctor Who. This is a time consuming project, but it is well worth it in the end. (The time goes by much faster when you re-watch favorite episodes while you work.)

I hope all of you enjoy this project as much as I did!

Monday, November 12, 2012

Crochet Hat With Ears

I've been looking for an interesting way to do something charitable for the holidays this year. After thinking about it for a while, I've decided to crochet a bunch of hats to donate to a children's hospital for children going through chemo treatment. So, over the next few weeks, I'm going to be posting several patterns for fun hats. I hope that you enjoy them and will consider donating a few to a children's charity yourself.

This is the second hat pattern. It starts out a lot like the first with a simple hat pattern. There are a few changes toward the end so I could add the ear flaps.
 This is my daughter wearing the hat. As you can see, it has ear-flaps as well as two ears added to the top. I thought about adding pom-poms to the ends of the ear-flaps. This could be a fun addition I just didn't do it with this one.
This is a better shot of the ears on top. If you wanted, you could do the inside a light pink to give the ears a two-toned look.


Hook: H/8-5.00 MM

Hat Body

Ch 5, sl st in 1st ch to create a circle

Ch 2, 10 dc in circle, join with a sl st

Ch 2, 2 dc in each dc around,

Ch 2, *dc in 1st dc, 2dc in next dc* around, join with a sl st

Ch2, *dc in first 2dc, 2d in next dc* around, join with a sl st

Ch2, *dc in first 3 dc, 2dc in next dc* around, join with a sl st

(If you are making this hat for an adult or a child with a larger head, simply continue the pattern for a few more rows here. With each new increase row, simply add 1 more dc between the 2dc spaces for each round. So the next row you would do would read: Ch2, *dc in first 4 dc, 2dc in next dc* around, join with a sl st. Do this until the top of your hat reaches the desired size. Remember: When you start building the body of the hat, the top curves off so when you size the top of the hat, it may look a little smaller than the head, but that is okay because it will even out as you start building the body.)

*Ch 2, dc in each dc around and join with a sl st* repeat for 6 rows

DO NOT FASTEN OFF!

(First ear-flap)

Ch 2, turn, dc in 15 dc spaces.

*Ch 2, turn, dc 2tog, dc across until last two, dc 2tog,* repeat for 7 rows (the last row you do should be dc 2tog, dc, dc 2tog)

Ch 2, turn dc 3tog, ch 16, fasten off.

(second ear-flap)

Fold hat in half to line up where you need to start the next ear-flap. It should sit directly across the hat from the first one.

Once you have loacated your starting stitch, connect new yarn with a sl st, ch 2, dc in the stitch you slip stitched in and the next 14. (15 dc in all)

*Ch 2, turn, dc 2tog, dc across until last two, dc 2tog,* repeat for 7 rows (the last row you do should be dc 2tog, dc, dc 2tog)

Ch 2, turn dc 3tog, ch 16, fasten off.


Join to edge with a sl st, ch 1, sc in each stitch around base of hat, ear-flaps, and ch 15. When you reach the end of the ch, (sc, ch 1 sc) in last ch and (ch 1, sc, ch 1, sc) in the same ch going back down the ch. This will round off the ends of the "straps." When you reach your first sc, join with a sl st.

Ears (make 2)

Ch 11, tr in 4th ch from hook, tr in next st, dc in next 2 ch, hdc in next 2 ch, sc in last 2 ch, ch 1, sc in first 2 ch going back up the other side, hdc in next 2 ch, dc in next 2 ch, tr in last 2 ch.

Ch 1, turn, sc around, fasten off leaving a long tail so you can use it to sew on the ears.


Lay hat flat and decide where you wan the ears to be attached  I chose to line mine up from the second to fourth rounds of the body of my hat. Use the extra tail on the ears and a yarn needle to sew on the ears.

I hope you had as much fun as I did making this one. I know children really love hats with ears like this. As usual feel free to re-post this pattern, but please include a link back to my page. Thank you.

Crochet Flower Hat

I've been looking for an interesting way to do something charitable for the holidays this year. After thinking about it for a while, I've decided to crochet a bunch of hats to donate to a children's hospital for children going through chemo treatment. So, over the next few weeks, I'm going to be posting several patterns for fun hats. I hope that you enjoy them and will consider donating a few to a children's charity yourself.


This is the first hat I worked on. It is a simple crochet hat pattern with a flower attached.


Hook: H/8-5.00 MM

Hat Body

Ch 5, sl st in 1st ch to create a circle

Ch 2, 10 dc in circle, join with a sl st

Ch 2, 2 dc in each dc around,

Ch 2, *dc in 1st dc, 2dc in next dc* around, join with a sl st

Ch2, *dc in first 2dc, 2d in next dc* around, join with a sl st

Ch2, *dc in first 3 dc, 2dc in next dc* around, join with a sl st

(If you are making this hat for an adult or a child with a larger head, simply continue the pattern for a few more rows here. With each new increase row, simply add 1 more dc between the 2dc spaces for each round. So the next row you would do would read: Ch2, *dc in first 4 dc, 2dc in next dc* around, join with a sl st. Do this until the top of your hat reaches the desired size. Remember: When you start building the body of the hat, the top curves off so when you size the top of the hat, it may look a little smaller than the head, but that is okay because it will even out as you start building the body.)

*Ch 2, dc in each dc around and join with a sl st* repeat for 5 rows

*Ch 1, sc in each st around and join with a sl st* repeat for 3 rows

Fasten off


Flower

Ch 5, sl st in the first ch to create a circle.

Ch 1, 10 sc in circle, join with a sl st

ch 1, sc in 1st sc, *ch 5, sc in next sc, sc in next sc* repeat around and join with a sl st. (if done right, you will have 5 ch loops)

ch 1, (working in ch 5 loop) *2 sc, 2 hdc, 2 dc, 1 tr, 2dc, 2 hdc, 2 sc* rep for each loop around, join with a sl st

Fasten off and attach to the hat.

Again, I hope you enjoy this project and consider making one or two for some children in need. Feel free to re-post this pattern, but please include a link back to my page. Thank you.

Wednesday, November 7, 2012

Crochet Baby Doll Carrier

After seeing my aunt carrying my baby cousin in a front carrier, my daughter has been asking for one for her babies. So tonight, I sat down and made a pattern for one. I think this one turned out awesome. It looks great, is comfortable for her to wear, and baby stays in it really well.

 This is my daughter sporting her new doll carrier. It has two straps coming off the top of the carrier. The straps cross in the back, go through a small loop on each side of the carrier and then tie a waist level.
 This is a side view. You can see the straps coming off the top and if you look close by the doll hand, you can see the loop the strap goes through.
The carrier is pouch style with two holes at the bottom for the doll legs. If your child's doll has larger legs you may have to make the leg holes larger.

Here's the pattern.

Hook: H/8-5.00MM

Ch 22, Dc in the 3rd ch from the hook and across. (22 Dc)

Ch 2, turn, Dc across for 7 rows (8 rows in total)

Ch 2, turn, Dc in next 5, ch 5, sk 5 st and Dc in 6th st ch 5 and Dc in last 5 st

Ch 2, turn, Dc across for 10 rows

Fasten off.

Fold over at the row W/leg holes and (starting at the fold) Sc up side, across top, and down other side W/(sc, ch 1, sc) in both corners.

Ch 1, turn, sc in first 2 sc, ch 3, sk 3 st and sc in 4th st and around (w/(sc, ch 1, sc) in both corners) until last 5 st. Ch 3, Sc in last 2 st.

Ch 1, turn, sc to corner ch 1 sp. *Ch 77, Dc in 3rd ch from hook and down ch, sc in ch 1 sp* and across to the next corner.

Repeat from * to * and sc down last side.

Fasten off and weave in ends.

If your child is older you may need to lengthen the straps. To do this, simply add more chains to the ch 77 in the last row. 

I used 100% cotton yarn for this project. I thought this would be a good idea because kids are messy and I will be able to throw it in with the laundry without really having to worry about it. The yarn I used was Peaches and Cream brand from Wal-Mart. I thought I could get away with only using one ball. As it turns out, I needed slightly more than one ball so now I have some left over for washcloths or something.

I hope you had fun with this one. Please feel free to comment and if you re-post this, please link back to my page.