Tuesday, December 4, 2012

Doctor Who! - Fourth Doctor's Scarf Crochet Pattern

As a HUGE Doctor Who fan, I wanted to make my own version of the iconic scarf worn by Tom Baker as the Fourth Doctor. My first step in making my pattern was to check out some of the others posted online. The best and , by far, most informative page I came across was Doctor Who Scarf .com The page gives background info on the scarf throughout its run on the show, suggestions for yarn brand and color, and several patterns depending on which version of the scarf you want to make and the type of yarn you want to use.

HOWEVER the patterns are all for the original knit version. Don't get me wrong, I love the look and feel of a knitted scarf. The problem is me. I've been crocheting from a very young age and only started really learning to knit very recently. I can handle a scarf as long as it is all one color. I originally started trying to knit this scarf but (as this was the first time I have been required to change colors when knitting) I didn't like how the edges were looking in the color change rows.

So, using the graph pattern from doctorwhoscarf.com I came up with my own pattern for this scarf in crochet instead.

(This is the semi-finished version of my scarf. This isn't really a good picture of it. The length of the scarf and the low light in my living room made it rather difficult to get a good picture.)

I would recommend checking out their great sight for brand and color suggestions before you start. All the yarn I used is Red Heart brand from Walmart. While I am happy with most of the colors, the red in my scarf is a little off. It needs to be a little brighter and more like the color of rust.

ALSO: When choosing your yarn for this pattern (ESPECIALLY IF YOU ARE KNITTING!) It is a good idea to get all your colors from the same type and brand. That said, it is more important to make sure all your yarn is the same texture and thickness. During the brief time I spent trying to knit this scarf, I discovered that the red yarn was a bit more coarse and slightly thicker than the rest of my yarn. This lead to the red parts of the scarf bulging out on the sides even though I used the same size needles.

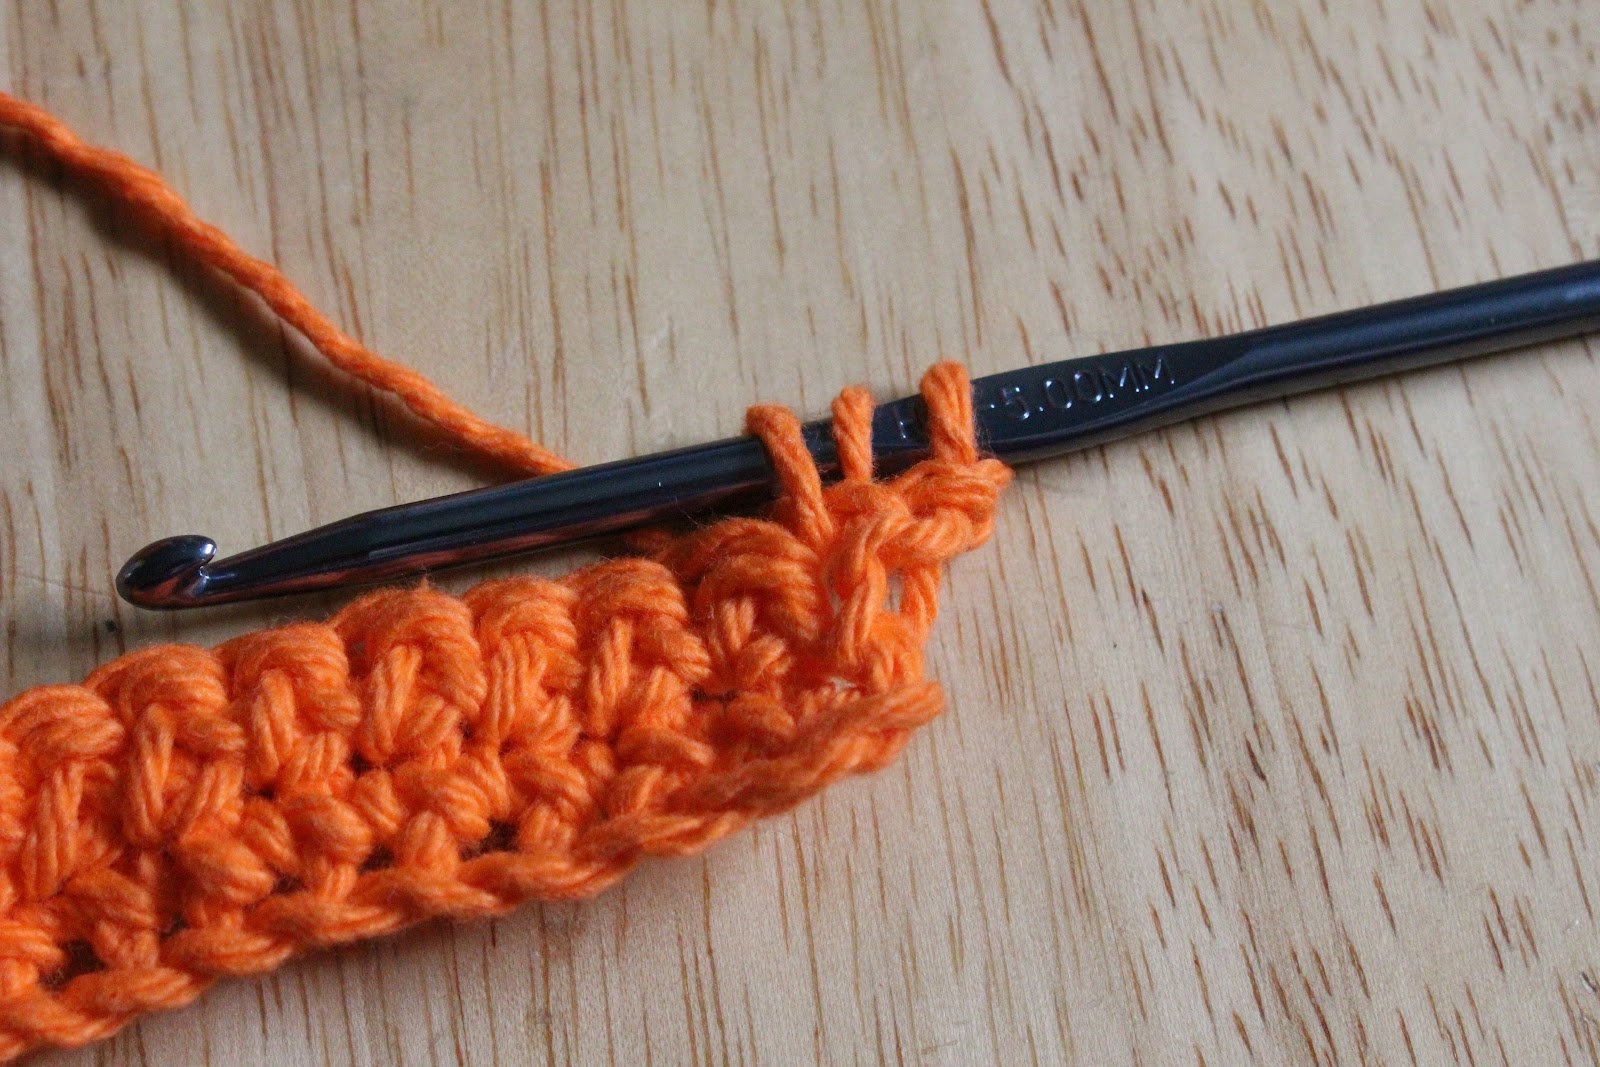
As you can see in this photo, the strip of red seems to have more stitches in it. It doesn't. The yarn is thicker than the rest of the colors so it bulges out on the sides. Now, this really isn't a huge deal, but I am a perfectionist when crocheting/knitting and really want the sides of my scarf to be even the whole way. To fix this problem in my crochet version, when I crochet the red stripes, I used a hook that was smaller than the one I used for the rest of the colors. If you run into this problem as well, try one or two sizes smaller to get the stitches the same size as the colors before them. I did most of the scarf with an I/9-5.50MM hook and for the red stripes, I changed to a G/6-4.25MM Hook.

Okay, lets talk about the pattern now.This is a link to the knit pattern I worked off of to create my crochet version. The pattern in the link shows the color pattern and the stripe sizes in inches.

For the crochet pattern, I first started to work in Sc but I did not like how stiff it made the scarf and personally I like how it looks more than Sc. If you like the look of Sc, simply swap out the Dc in the pattern for Sc and do twice as many rows than the pattern says.

Below, is the full crochet version of the pattern. I hope you enjoy it.

Pattern:

Hook: I/9-5.50MM

Starting with the plum color, ch 37, dc in 3nd ch from hook and in every ch across. (35sc)
Fasten off

For the rest of the pattern, using the color stated, join in 1st Dc on next row, ch 2, and Dc across for stated number of rows.

Light Tan: 11

Light Caramel: 2

Mustard Yellow: 1

Rust Red: 4

Plum: 1

Charcoal Gray: 8

Army Green: 4

Yellow: 1

Tan: 4

Red: 2

Caramel: 1

Plum: 1

Green: 9

Yellow: 1

Gray: 4

Red: 1

Tan: 11

Plum: 1

Green: 4

Gray: 2

Yellow: 1

Red: 4

Plum: 1

Caramel: 7

Tan: 1

Gray: 1

Red: 8

Yellow: 2

Green: 4

Plum: 1

Tan: 8

Caramel: 1

Gray: 3

Red: 1

Plum: 2

Tan: 1

Yellow: 2

Green: 12

Red: 2

Gray: 2

 Yellow: 1

Caramel: 3

Plum: 1

Tan: 1

Gray: 6

Red: 1

Yellow: 2

Tan: 2

Plum: 1

Caramel: 5

Red: 1

Plum: 6

Fasten off and weave in all loose ends.

It's up to you how many tassels you want to add to the ends. At first, I placed 12 with 2 stitches between each one. I think on one end I had three between the last two but you can't really tell by just looking at the scarf.

To make a tassel, cut a 6" strip of each color of yarn.

Put all the strips together (making sure you line up the ends to make sure they are even) and fold in half.

Insert your hook into the stitch you want the tassel to go through, grab the loop end of the strips and pull through the stitch. (DO NOT PULL ALL THE WAY THROUGH. You want a loop on one side of the scarf and the cut ends on the other.)

Pull the cut ends of the strips through the looped end and pull tight.

*When making more than one tassel, make sure you are inserting your hook into the same side of the scarf so all of the knots end up facing the same way.

While it's not true to the original, I also like the look of smaller tassels. Instead of doing the bunches, I cut 5 strips of each color for each end of the scarf and put one through each stitch. This spreads the tassels across the entire end of the scarf. I like the even look to this type of ending but if you want to be more true to the original, stick with the first type of tassels.

(In the end, I decided to go with the more spread out version. This is what it should look like when you are done. I wouldn't choose yarn colors by this photo, the flash on my camera made them look a little weird)

I modified my finished scarf slightly from this pattern. After adding my tassels, I decided to take advantage of the considerable length and width of this scarf and turn it into a hooded scarf. To do this, I simply folded the scarf in half and stitched a seam about one foot long down one side. I LOVE THIS AS A HOODED SCARF! It looks really beautiful, but I can't get a good enough photo of it in a mirror, so you're going to have to wait to see it until I can get my husband to take a good photo of me wearing it.

This was a project that I really enjoyed working on as it combined two of my favorite things; crocheting and Doctor Who. This is a time consuming project, but it is well worth it in the end. (The time goes by much faster when you re-watch favorite episodes while you work.)

I hope all of you enjoy this project as much as I did!

Monday, November 12, 2012

Crochet Hat With Ears

I've been looking for an interesting way to do something charitable for the holidays this year. After thinking about it for a while, I've decided to crochet a bunch of hats to donate to a children's hospital for children going through chemo treatment. So, over the next few weeks, I'm going to be posting several patterns for fun hats. I hope that you enjoy them and will consider donating a few to a children's charity yourself.

This is the second hat pattern. It starts out a lot like the first with a simple hat pattern. There are a few changes toward the end so I could add the ear flaps.
 This is my daughter wearing the hat. As you can see, it has ear-flaps as well as two ears added to the top. I thought about adding pom-poms to the ends of the ear-flaps. This could be a fun addition I just didn't do it with this one.
This is a better shot of the ears on top. If you wanted, you could do the inside a light pink to give the ears a two-toned look.


Hook: H/8-5.00 MM

Hat Body

Ch 5, sl st in 1st ch to create a circle

Ch 2, 10 dc in circle, join with a sl st

Ch 2, 2 dc in each dc around,

Ch 2, *dc in 1st dc, 2dc in next dc* around, join with a sl st

Ch2, *dc in first 2dc, 2d in next dc* around, join with a sl st

Ch2, *dc in first 3 dc, 2dc in next dc* around, join with a sl st

(If you are making this hat for an adult or a child with a larger head, simply continue the pattern for a few more rows here. With each new increase row, simply add 1 more dc between the 2dc spaces for each round. So the next row you would do would read: Ch2, *dc in first 4 dc, 2dc in next dc* around, join with a sl st. Do this until the top of your hat reaches the desired size. Remember: When you start building the body of the hat, the top curves off so when you size the top of the hat, it may look a little smaller than the head, but that is okay because it will even out as you start building the body.)

*Ch 2, dc in each dc around and join with a sl st* repeat for 6 rows

DO NOT FASTEN OFF!

(First ear-flap)

Ch 2, turn, dc in 15 dc spaces.

*Ch 2, turn, dc 2tog, dc across until last two, dc 2tog,* repeat for 7 rows (the last row you do should be dc 2tog, dc, dc 2tog)

Ch 2, turn dc 3tog, ch 16, fasten off.

(second ear-flap)

Fold hat in half to line up where you need to start the next ear-flap. It should sit directly across the hat from the first one.

Once you have loacated your starting stitch, connect new yarn with a sl st, ch 2, dc in the stitch you slip stitched in and the next 14. (15 dc in all)

*Ch 2, turn, dc 2tog, dc across until last two, dc 2tog,* repeat for 7 rows (the last row you do should be dc 2tog, dc, dc 2tog)

Ch 2, turn dc 3tog, ch 16, fasten off.


Join to edge with a sl st, ch 1, sc in each stitch around base of hat, ear-flaps, and ch 15. When you reach the end of the ch, (sc, ch 1 sc) in last ch and (ch 1, sc, ch 1, sc) in the same ch going back down the ch. This will round off the ends of the "straps." When you reach your first sc, join with a sl st.

Ears (make 2)

Ch 11, tr in 4th ch from hook, tr in next st, dc in next 2 ch, hdc in next 2 ch, sc in last 2 ch, ch 1, sc in first 2 ch going back up the other side, hdc in next 2 ch, dc in next 2 ch, tr in last 2 ch.

Ch 1, turn, sc around, fasten off leaving a long tail so you can use it to sew on the ears.


Lay hat flat and decide where you wan the ears to be attached  I chose to line mine up from the second to fourth rounds of the body of my hat. Use the extra tail on the ears and a yarn needle to sew on the ears.

I hope you had as much fun as I did making this one. I know children really love hats with ears like this. As usual feel free to re-post this pattern, but please include a link back to my page. Thank you.

Crochet Flower Hat

I've been looking for an interesting way to do something charitable for the holidays this year. After thinking about it for a while, I've decided to crochet a bunch of hats to donate to a children's hospital for children going through chemo treatment. So, over the next few weeks, I'm going to be posting several patterns for fun hats. I hope that you enjoy them and will consider donating a few to a children's charity yourself.


This is the first hat I worked on. It is a simple crochet hat pattern with a flower attached.


Hook: H/8-5.00 MM

Hat Body

Ch 5, sl st in 1st ch to create a circle

Ch 2, 10 dc in circle, join with a sl st

Ch 2, 2 dc in each dc around,

Ch 2, *dc in 1st dc, 2dc in next dc* around, join with a sl st

Ch2, *dc in first 2dc, 2d in next dc* around, join with a sl st

Ch2, *dc in first 3 dc, 2dc in next dc* around, join with a sl st

(If you are making this hat for an adult or a child with a larger head, simply continue the pattern for a few more rows here. With each new increase row, simply add 1 more dc between the 2dc spaces for each round. So the next row you would do would read: Ch2, *dc in first 4 dc, 2dc in next dc* around, join with a sl st. Do this until the top of your hat reaches the desired size. Remember: When you start building the body of the hat, the top curves off so when you size the top of the hat, it may look a little smaller than the head, but that is okay because it will even out as you start building the body.)

*Ch 2, dc in each dc around and join with a sl st* repeat for 5 rows

*Ch 1, sc in each st around and join with a sl st* repeat for 3 rows

Fasten off


Flower

Ch 5, sl st in the first ch to create a circle.

Ch 1, 10 sc in circle, join with a sl st

ch 1, sc in 1st sc, *ch 5, sc in next sc, sc in next sc* repeat around and join with a sl st. (if done right, you will have 5 ch loops)

ch 1, (working in ch 5 loop) *2 sc, 2 hdc, 2 dc, 1 tr, 2dc, 2 hdc, 2 sc* rep for each loop around, join with a sl st

Fasten off and attach to the hat.

Again, I hope you enjoy this project and consider making one or two for some children in need. Feel free to re-post this pattern, but please include a link back to my page. Thank you.

Wednesday, November 7, 2012

Crochet Baby Doll Carrier

After seeing my aunt carrying my baby cousin in a front carrier, my daughter has been asking for one for her babies. So tonight, I sat down and made a pattern for one. I think this one turned out awesome. It looks great, is comfortable for her to wear, and baby stays in it really well.

 This is my daughter sporting her new doll carrier. It has two straps coming off the top of the carrier. The straps cross in the back, go through a small loop on each side of the carrier and then tie a waist level.
 This is a side view. You can see the straps coming off the top and if you look close by the doll hand, you can see the loop the strap goes through.
The carrier is pouch style with two holes at the bottom for the doll legs. If your child's doll has larger legs you may have to make the leg holes larger.

Here's the pattern.

Hook: H/8-5.00MM

Ch 22, Dc in the 3rd ch from the hook and across. (22 Dc)

Ch 2, turn, Dc across for 7 rows (8 rows in total)

Ch 2, turn, Dc in next 5, ch 5, sk 5 st and Dc in 6th st ch 5 and Dc in last 5 st

Ch 2, turn, Dc across for 10 rows

Fasten off.

Fold over at the row W/leg holes and (starting at the fold) Sc up side, across top, and down other side W/(sc, ch 1, sc) in both corners.

Ch 1, turn, sc in first 2 sc, ch 3, sk 3 st and sc in 4th st and around (w/(sc, ch 1, sc) in both corners) until last 5 st. Ch 3, Sc in last 2 st.

Ch 1, turn, sc to corner ch 1 sp. *Ch 77, Dc in 3rd ch from hook and down ch, sc in ch 1 sp* and across to the next corner.

Repeat from * to * and sc down last side.

Fasten off and weave in ends.

If your child is older you may need to lengthen the straps. To do this, simply add more chains to the ch 77 in the last row. 

I used 100% cotton yarn for this project. I thought this would be a good idea because kids are messy and I will be able to throw it in with the laundry without really having to worry about it. The yarn I used was Peaches and Cream brand from Wal-Mart. I thought I could get away with only using one ball. As it turns out, I needed slightly more than one ball so now I have some left over for washcloths or something.

I hope you had fun with this one. Please feel free to comment and if you re-post this, please link back to my page.

Tuesday, October 16, 2012

Cute Fall/Winter Leg Warmers: Made from the sleeves of an old sweater!

Time for my first non-crochet post!!

For a while now, I've been wanting a cute pair of leg warmers to wear with my boots this fall/winter. At first, I considered knitting a pair from start to finish but due to all the other projects I have going on (11 foot knitted scarf among others) I just don't have the time and I am far too impatient to wear them. So while I was going through my closet I came across this old sweater. While it is still in great condition, I just don't wear it as much anymore and decided it would go to far better use as my new leg warmers.


 One of the main tools you are going to need (aside from scissors and your sewing machine) is a seam ripper.

 Turn you sweater inside-out and located the shoulder seam. If you are working with a tight-knit sweater, it may be possible to just cut your shoulder seam. In my case, this sweater was rather loose-knit. It may be difficult to find the seam thread, but if you can, you will be able to handle the sleeve with less unraveling.

 Carefully remove both sleeves from the sweater.

 Depending on the size of your sleeves and the style of leg warmers you want, you may have to cut down the length of the sleeve. You can't see it in this photo but before cutting, I used my sewing machine and stitched down the length of the sleeve before cutting so there was no unraveling as I cut of the unwanted material.

 Cut the end of the sleeve off where it starts to curve.

 Carefully fold over cut end making sure you line up the seams. Sew around the opening to create a hem. Make sure you do not pull the sleeve as you go because you don't want to stretch out the end of your legwarmer.
This is the finished product. I wanted mine more fitted. If you want a loose style, leave the extra fabric on instead of cutting along the length of the sleeve.

I hope you find this project as easy and fun as I did. I love how these turned out and I can't wait to wear them with my boots.

Also, don't worry about the rest of this nice sweater going to waste. I'm thinking a pair of mittens and some sort of ear-warmer/scarf are in the works for this sweater as well. So look for those projects in the near future.

Stormi

Monday, October 8, 2012

Flower Winter Headband/Ear-warmer


Flower Ear-Warmer Headband


(More photos follow at the end of the post.)

Introduction
This is a pattern I made based on a Pinterest pin. I'm not sure where the original pattern came from because the link was broken when I clicked on it. I fell in love with this headband/ear-warmer as soon as I saw it and had to come up with a pattern of my own for it. I'm not sure how accurate this is to the original pattern, but it looks very much like the Pinterest photo I was working off of. Once I got the pattern down, it only took me 1 to 1 1/2 hours to finish this headband so it is a pretty quick and easy pattern.

Materials List
Any worsted weight yarn (I used acrylic yarn for the one in the photo, but this pattern would work great with cotton or wool as well.)
USA G-4.25 mm hook
Yarn needle

Headband
Ch 4
Row 1: sc in 2nd ch and across, ch 1, turn
Row 2: 2 sc in 1st st, sc 1, 2 sc in last ch, ch 1, turn
Row 3: sc across, ch 1, turn
Row 4: 2 sc in 1st st, sc to next to last st, 2 sc in last st, ch 1, turn
Repeat Rows 3 and 4 until you have 13 stitches.

Pattern Row: 
dc in first stitch, *skip 1 stitch, work (sc, dc) in next stitch; repeat from * until there are two stitches remaining. skip 1 stitch, sc in the turning chain of the previous row, ch 1, turn

Work pattern row until it reaches approximately 12 inches** from the start of the pattern (do not count the sc).

**If you need to adjust the pattern to fit your head better or to fit the head of a child change the length of pattern rows you do. If you need the headband to be larger, work for an additional inch or two. If you need to shorten the headband, work the pattern for fewer inches.

Row 1: Sc 2 tog, sc to last 2 st, sc 2 tog, ch 1, turn
Row 2: sc across, ch 1, turn
Repeat  rows 1 and 2 until you have 3 stitches remaining.
Ch 1, Turn, sc across for 3 additional rows.

Sc around headband, with 2 sc in corner stitches. When you reach the first end, sc in the first st, ch 5, sc in 3rd st and continue around making sure you sc twice in each corner. Join with sl st and fasten off.
Attach button to top side of other end. Use yarn needle to weave in ends.

Flower
 ch 5; join with a slip st to form ring.
Round 1: Ch 5 (counts as dc and ch-2), [dc, ch 2] 5 times in ring; join to 3rd ch.
Round 2: Ch 1, (sc, hdc, dc, tr, dc, hdc, sc) in each ch-2 space around – 6 petals.
Round 3: Holding Round 2 forward, * sc in dc from Round 1, ch 3; repeat from * around; join.
Round 4: Ch 1, (sc, hdc, dc, 3 tr, dc, hdc, sc) in each ch-3 space around – 6 petals.
Round 5: Holding Round 4 forward, * sc in sc from Round 3, ch 4; repeat from * around; join.
Round 6: Ch 1, (sc, hdc, dc, 5 tr, dc, hdc, sc) in each ch-4 space around – 6 petals. Fasten off.

Position flower where you want it on the headband. (I prefer how it looks off to one side. ) Using your crochet hook, pull a length of yarn through so one end is through the front of the head band and the other through the back. Using the end  through the front, insert the end up (back to front) through the center circle of the flower, pull it back down through one of the ch 2 spaces and back up through the center circle, then insert the end through the ch 2 space directly across from the one you put it through before and down through the headband. Tie the two ends together and use yarn needle to weave in the ends.

Have fun with this one. I hope you love it as much as I do and if you share this, please link back to my blog.
Happy Crocheting!
Stormi
(Up-close shot of the stitch pattern)

(Picture of the back of the headband)

 (This is the pattern size on my daughter. I'm going to make one to fit her. I think I will make the "patterned" section of her's about 9 inches instead of 12 so it fits her head better.)
 (Side view of the pattern size headband on my daughter.)


Sunday, October 7, 2012

Beautiful Winter Bow-Tie Headband/Earwarmer


Hook used: I (5.50 mm)
Yarn used: Red Heart Super Saver (This pattern would also work great with wool or cotton yarn)

The Head Band
Ch 12
ROW 1: dc in 3rd ch from hook and in each ch across. (10 dc)
ROW 2-25: ch2, turn, dc in each st across, (10 dc)
Fold in half to line up both ends.
Ch1, turn, sc in each stitch across. (make sure you are working your sc through both ends at the same time.) This connects the ends.
Fasten off and weave in ends.

(If you need to make the band longer or shorter to fit any head, simply add or leave off rows.)

Bow-Tie Band
Ch 5
ROW 1: Sc in the 2nd ch from the hook and in each across (4 sc)
ROW 2-10: ch 1, turn, sc in each st across
Fold in half around headband and line up ends.
Ch 1, turn, sc in each stitch across. (make sure you are working your sc through both ends at the same time.)
Fasten off and weave in ends.

Twist Bow-Tie Band around so the seam is underneath, Line the Bow-Tie band up over the seam of the headband to hide the seam.

* If you would like to adjust this pattern to make a Bow-Tie Headband for a child, start with a ch 7 instead of 12 and work enough rows to fit the child's head. When making the Bow-Tie band, work 5 rows instead of 10.

Monday, September 17, 2012

Awesome Coffee Mug Cozy pattern

A few days ago, I was looking through crafts one of my friends had pinned on Pinterest and I came across a photo and link to another blog.

This is the photo from All About Ami an awesome blog with lots of cool ideas. I made the cozy to her instructions and I loved it! It's worth trying if you like this style because it is easy to do and looks great.

After making one of this style, I realized that it does have a few drawbacks. It will really only fit the mug size and style you make it for. I wanted to come up with a pattern of my own that would fit any mug I wanted to put it on, (even the tall, no-handle style you get at gas stations or coffee shops) and still had a nice classy look.

So after a little planning and experimenting, I ended up with something that looks like this:
 I changed how the cozy loops around the handle of the mug so that it feels slightly more secure and to add the option to use it on handle less cups.
 By attaching three buttons, you can use the cozy on almost any size mug. I also reinforced my button hole to make it feel more sturdy.
 To use this cozy on a tall handle less cup, you simply thread the "strap" part of the cozy through the hole for standard mug handles before buttoning it.
This cozy looks awesome and works awesomely on any style and size of coffee mug!

Now for the pattern!

Awesome Coffee Mug Cozy:

You will need:
Cotton yarn in the color(s) of your choice
Three buttons
Size H crochet hook

Ch 11

Sc in 2nd ch from hook and in every ch across.

Ch 1, turn and sc in first sc of previous row, ch 8 and sc in last sc of previous row.

Ch 1, single crochet in first sc and in top loop of each ch in the ch 8 from the previous row, sc in last sc of previous row.

*Ch 1, turn, sc in each sc across* 

Repeat from * to * 24 more times.

Ch 1, sc in 2nd sc space (skipping the first sc) sc across skipping the 2nd to last sc and sc in last sc of previous row. (This is a decrease row.)

Do another decrease row.

*Ch 1 sc in each sc across.* 

Repeat from * to * 10 more times.

Do 2 decrease rows. 

Ch 1, turn, sc in first sc from previous row, ch 5, sc in last sc of previous row.

Sl st in same sc. ( to slip stitch, you work it just like a sc, instead of keeping the second loop on the hook, you pull it through the first.)

Ch 1, single crochet around the entire outside of the cozy with 6sc in the ch 5 loop. Join with a sl st, cut yarn, and use a yarn needle to hide the ends.

Attach your first button about 2" from the inside of the handle hole. Attach the other two buttons about 1" apart along the cozy. Use your yarn needle to hide the ends and you're done!

Enjoy your awesome coffee mug cozy.

Crochet Basics: Learning Basic Stitches While Making a Cute Cool Weather Scarf

In this post, we are going to go over the three basic stitches of crochet. While there are several others, the main stitches you will need to know are Chain, Single Crochet, and Double Crochet. Most other stitches you may need will be some variation of these three stitches.

I've decided to make learning the stitches fun by incorporating the learning into a pattern for a Cool Weather Scarf. This pattern is quick and simple and is the perfect pattern for learning the basic stitches. I will include the pattern, followed by photos demonstrating the stitches while I work the scarf pattern as well as how to finish and trim the edges of the scarf. Good luck with your first pattern. I would love comments telling me how it went for you.

Cool Weather Scarf

Size H/8 - 5.00MM Crochet hook
1 skein worsted weight cotton yarn in your choice of color

Instructions:

Leaving a 3" tail at the start, Ch 16

Sc in 2nd Ch from hook and in each Ch across (15 sc)

Ch 1, turn and sc in each sc across  (15 sc)

*Ch 2, turn and dc in each sc across (15 dc)

Ch 2, turn and dc in each dc across (15 dc)

Ch 1, turn and sc in each dc across (15 dc)

Ch 1, turn and sc in each sc across (15 dc) *

Repeat from * to * until your scarfs reaches desired length.

Fasten off leafing 3" tail.

Cut 30 6" pieces of yarn. For each stitch across each end, fold 1 piece of yarn in half and insert the looped end through both loops of 1 sc. Thread the cut ends through the loop and pull tight. (At each end, make sure you pull the left over 3" tail through the loop as well before you pull the yarn tight. This will hide your start and finish tails in your fringe.) After you have done this for each stitch across each end of your scarf, lay flat and trim fringe to desired length.

So, I wanted to have a few videos here showing you how to do each of these stitches, but for some reason, I  cannot get them to upload. I'll work on getting that fixed, but for now, pictures are going to have to do.


For this project, you will need a skein of cotton yarn in the color of your choice, a pair of scissors, and your size H crochet hook.

When I was first learning as a child, this is how I was taught you hold your yarn while you crochet. Some people hold their's differently so go with what you are comfortable with. This is how you will see me hold mine because it keeps the yarn where you need it and the rest of it out of the way at the same time. Starting on the palm side of your hand, wrap the yarn around your little finger counter clockwise. After pulling the yarn back to the palm side of your hand, wrap around the back of your index finger and hold yarn end between your thumb and middle finger.


You want to start with a slip knot on your hook. You can do this by making a loop in your yarn, holding the loop together between your thumb and middle finger, and using your hook to pull a loop of yarn through the first loop. Pull tight and you should have a nice slipknot to start with. You want to start with a slip knot because you can pull it to adjust it's size if you need to and also because if you make a mistake or if you don't like how your project is turning out, you can simply remove your hook and pull the yarn to take it out and not waste any yarn.


This is how you start any stitch in crochet. Most patterns will refer to this as a YO (yarn over). When holding your yarn the way I showed before, you twist the hook so that it goes under the yarn and grabs it like this.


This is your first Ch (chain) To do this, you YO and pull the yarn you grabbed through your slipknot. This is the most basic stitch in crochet and you will use it in every crochet pattern you come across.

This is what it looks like when you do several chains all together. You want it to be a nice middle ground between loose and tight. This may take some practice as most people will either crochet too tight or too loose to begin with, it just depends on the person. It takes practice to learn the correct tension for your yarn. Many patterns will refer to this as the base chain because it often makes up the base of your pattern. As you can see, the chain is made up as a series of V's. Each set of V's is one chain. When doing the next row, you will only go through the top part of the V.


Now we are going to do the first sc (single crochet) To start, you insert the hook into the top loop of the second chain from your hook. If you look close in the photo, between the two loops on the hook, you can see the first ch that is skipped. Once you have your hook inserted, YO and pull a loop of yarn back through the ch. Now you should have two loops on your hook just like the picture above.


YO and pull a loop of yarn through both loops on your hook. This is how you single crochet. All together, you insert your hook into the second ch from your hook, YO, pull the loop through the ch, YO and pull the yarn through both loops on your hook.


You will do this same stitch all the way back down your chain, inserting your hook in the top loop of each remaining chain.


Now you have to start the second row. To do this, you ch 1 and then turn the whole thing to the left. Now you will be looking at the back side of the row you just finished and you will have lined the stitches up so that you can now work across the top of the previous row.


When doing the next row, look at the top of the previous row and you will see the same V's the chain made. This time, instead of going through only one loop, you will go under both sides of the V. Some patterns you come across will tell you to only go under one or the other, this creates a texture that we will go over in another project.


Now that you have finished your first two rows of sc, we are going to do a row of dc (double crochet) To start this row, you ch 2 (this chain at the beginning of the row is to bring your yarn up to the height of the stitch you are doing. ch 1 for sc and ch 2 for dc) turn the project to the left so you see the back side of the previous row.


To start the dc, you are going to YO BEFORE you insert your hook into the first sc of the previous row.


After inserting your hook through the first sc of the row before, YO and pull a loop back through the stitch. Now you will have three loops on your hook just like the picture above.


YO and pull the yarn through the first 2 loops on your hook. Now you will have 2 loops left on your hook just like the picture above.


YO and pull the yarn through both loops on your hook. This is how you dc. All together, you YO, insert your hook into the sc of the row before, YO and pull the yarn back through the stitch, YO and pull yarn through the first 2 loops on your hook, YO and pull the yarn through the last two loops on your hook. 


Dc all the way across to finish your dc row.


This picture shows a small sample of the pattern you will be doing. As you can, startign at the bottom, there are two rows of sc, a row of dc, and two rows of sc. This is a very simple way to add a pattern to your scarf without doing anything too difficult.  These three stitches make up about 90% of the stitches you will use in crochet. There are others, but for the most part, you will be using these three or a variation of one or more of them.


To finish this scarf, ch 1 and cut your yarn about 3" from your hook. 


Use your hook to pull the loop until the cut end pulls free. Pull the yarn until the ch 1 pulls tight.


The pattern calls for you to cut 30 6" pieces of yarn. To make the fringe at the ends of the scarf, fold each piece in half so that there is a loop at one end like in the picture above.


Insert you hook through one stitch in your last/first row of your scarf. 


Use your hook to pull the loop end of your yarn piece through the stitch.


Pull the cut ends of the piece of your yarn through the loop. For the tails of yarn from starting and finishing, make sure that you pull them through the loop of the piece of fringe closest to them. 


Pull the thread tight so that the loop closes around the yarn and holds it tight to create the fringe at the ends of your scarf. You can either leave the fringe long, or lay the scarf flat and use your scissors to cut it to a shorter length. 

You can also finish this scarf another way if you do not like fringe. Simply use a plastic, blunted yarn needle to pull the tail ends back down through the sc row. If you look at the row from the side, you will see a series of upright V's. The needle will slip easily through these. Pull the yarn through, pull it a little tight, cut it, and then flatten the row to hide the end. 

I hope you found these instructions easy to follow. Please leave comments to let me know how easy it was to follow.

Enjoy working on this Cool Weather Scarf. My next post will be a pattern for how to make this really awesome coffee mug cozy.