Monday, August 29, 2016

Crochet, Amigurumi Baby Mew Pattern


Baby Mew
Size 7 (or G/6) Crochet hook
Stitch marker
Yarn Needle
Pink Yarn
Small amount of blue yarn
 Poly-Fil

Notes:
This pattern is worked in rounds. This means you use a stitch marker to mark the last stitch in each row and instead of joining with a slip stitch at the end of each row, you simply continue in one continuous spiral. 
I like to fasten off with a slip stitch into the next stitch, chain 1, cut the thread and pull it through the loop. 

Head:
Magic Ring with 6 sc
Increase around
*Sc, increase* around
*2sc, increase* around
*3sc, increase* around
Sc around for 3 rows
*3sc, decrease*around
*2sc, decrease* around
Stuff
*sc, decrease* around
Decrease around
Fasten off and sew closed

Body:
Magic Ring with 6 sc
Increase around
*sc, increase* around
Sc around for 8 rows
*sc, decrease* around
Fasten off leaving end open and keeping a tail long enough to sew to head.

Ears x2:
Magic Ring with 6sc
*sc, increase* around
*2sc, increase* around
*3sc, increase* around
Fasten off leaving enough tail to sew to head.

Nose:
Magic Ring with 6sc
Increase around
*sc, increase* around
Fasten off leaving enough tail to sew to head

Feet x4:
Magic Ring with 6sc
*sc, increase* around
Sc around for 3 rows.
Fasten off leaving enough tail to sew to body

Tail:
Magic Ring with 6sc
Increase around
Sc around for 4 rows
Stuff
Dec around
Sc around for 8 rows
Fasten off leaving enough tail to sew to body.


Sew together and use blue yarn to embroider eyes. 

Thursday, January 7, 2016

Crochet Tail (Mermaid / Dinosaur / Etc) Blanket Pattern : Instructions for both adult and child sizes.


A while back, my sister came to me with a blanket project that she wanted me to make for her. Well, one thing happened and then another and the blanket just never got made. Fast forward about a year and she comes to me with it again as a Christmas project.

If you've come across any of my previous posts, you will know I NEVER purchase patterns when I can make one of my own or find a free one that is similar enough to what I need. So, when my sister brought up the mermaid tails for a second time, I began by searching the internet. 

There are TONS of patterns with TONS of different styles out there for free. There were things I liked about each and every pattern, however, none of them 100% fit what I was looking for. Instead, I printed off one that had a good general pattern and went from there. 

The pattern I started with was Adult Sized Mermaid Lapghan by Mad Hooker Crochet.

Over all, this is a great pattern and seasoned crocheters will have no problem following it. As for beginners, I think it may be a little difficult to follow. This is mainly due to the style in which the pattern is written out and edits were made to the post. I strongly urge you to check out their blog as there are several other patterns and fantastic project ideas.

This project is one that can be customized in an infinite number of ways. I have made three so far One was solid pink with solid green fins, one was solid pink with dark and light striped fins, and the other alternated colors with every row and has dinosaur spikes down the front of it. Change it up, experiment with color combos and different types of tails. The only thing I would discourage is attempting to make three in the two week span before Christmas. Speaking from experience, this can have some unfortunate consequences for your hooking arm.


The original pattern called for an H hook and I decided to use a K instead. When using the larger hook, the pattern works up much faster and the "scale" shapes become more prominent when only using one color instead of doing stripes. The larger hook size also meant that I had to adjust the numbers of stitches and rows for the pattern. This was something I was going to have to do from the start to make this pattern fit a child, but the numbers for the adult size would have changed as well.

What follows is the pattern/sizing instructions and pictures of my alterations to their original pattern.

Just as a fun bit of info and a glimpse into how I work, this is what often happens when I create or modify patterns. Unless I am planning on making a blog post about it, this is also what I usually have to work with if I ever decide to make more from the same pattern.


Most of this pattern is worked in a repeating pattern of shell clusters. This gives a nice "scale" look to the entire tail.


Tools and Materials:

K/6.50MM Crochet hook (Keep in mind, the way this pattern is written, you can change the size of the hook without any issue. Larger hook sizes will mean less stitches and a more prominate "scale" pattern when working with only one color)

Worsted Weight Yarn (This is also not set in stone with this pattern. You could easily use a different weight pattern and add/subtract stitches as you need.)

*Note on the amount of yarn: Because this pattern is written to fit your needs, I cannot really give an accurate estimate of how much you will need as this will depend on the size of tail you are making. I will say the three I have made so far have been child-sized and fit the average size 4-8 year old. With these three, I think I used about 1 1/2 skeins EACH total.

Yarn Needle For hiding ends and attaching the fins/scales/etc.

Abbreviations:
Ch: Chain
St: Stitch
Sl: Slip
Sk: Skip
Dc: Double Crochet
Sc: Single Crochet
sc2tog: Single Crochet 2 Together
Hdc: Half Double Crochet

Pattern: What follows will be the pattern for the child size tails I have made so far with suggestions for alterations in size and notes in Bold.

Start with a foundation chain of 92.

*IMPORTANT* When deciding how long your foundation chain needs to be, it should be at least long enough to easily tuck under both thighs when draped across the top of the legs. The only requirement is the number of chains MUST be a multiple of 6 (with 2 added to work as your first Dc) to accommodate the pattern in the following rows. 

Dc in the third ch from hook and in each ch across.

1: Ch 1 and turn. Sc in last st of previous row, [Sk 2, dc 5 in next st, Sk 2 Sc in next st] repeat from [ to ] across ending with a Sc in the first st of the previous row.

2: Ch 2 and turn. 2 Dc in last st of previous row  (this counts as 3 Dc or 1/2 a shell st), [Sc in the center (3rd) dc of next shell, 5 Dc in next Sc.] repeat from [ to ] across ending with 3 Dc in the first Sc from the previous row. 

Repeat rows 1 and 2 for 30 rows (This number could be off by one. You want to make sure the last row you do is pattern row 2)

*For larger sizes or taller kids (or smaller if that is what you need) you will need to add (or remove) repeated rows here. You want to reach a length that fits from the hips to just below the knees when seated.

Join both ends (into a circle) with a Sl St into the first Dc of the row.

3: Ch 1, Sc into the St you joined into, 5 Dc into next Sc, [Sc in the center (3rd) dc of next shell, 5 Dc in next Sc.] repeat from [ to ] around and join with a Sl St into the first Sc of the round.

4: Ch 3, 4 Dc into the St you joined into, Sc in the center (3rd) Dc of next shell, [5 Dc in next Sc, Sc in the center (3rd) Dc of next shell] repeat from [ to ] around and join with a Sl St to the fist DC of the round.

Repeat rows 3 and 4 for 15 rows.

*For larger sizes or taller kids (or smaller) you will need to add (or remove) repeated rows here. You want to reach total length that fits from the hips to mid calf (or just below) when seated.

Now you will start to decrease and bring the tail to a point. To do this, you will work a series of different decrease rows. These decrease rows should work the same for any size of tail you are making. Simply follow the pattern as it is written from here on out.

Repeat rows 3 - 4 twice and SUBSTITUTE every other shell in the row with a 1/2 shell (3 Dc instead of 5). (i.e. full shell, Sc, half shell, Sc Full shell...)

Repeat row 3 once and SUBSTITUTE every shell for a half shell.

The next rows, you will repeat until the tail is closed on the end.

5: Ch 3, 2 Dc in the same st as join, Sk 1, sc2tog, Sk 1, [ 3 Dc in next St, Sk 1, sc2tog] repeat around and join with a Sl St into the first Dc of the round.

6: Ch 1, sc2tog, Sk 1, 3 Dc in next St, Sk 1, [ sc2tog, Sk 1, 3 Dc in next st] repeat around and join with a Sl St into the first sc2tog of the round.

When your tail is mostly closed at the end, fasten off, turn inside out,  weave through the stitches of your last row, pull tight to close, tie off and weave in the end.

Fins: Make 2
1: Ch 25, Sc in the 2nd Ch from the hook and next 4 (for a total of 5 Sc) Hdc in next 4, Dc in the next 6, Hdc in the next 4, Sc in the next 5, Ch 2 and turn to work down the opposite side of the chain. Sc in next 5, Hdc in next 4, Dc in next 6, Hdc in next 4, Sc in next 5.

2: Ch 1 and turn. [Sc in next 3, Hdc in next 4, Dc in next 10*, Hdc in next 4, Sc in next 3] (2 Sc, Ch 2, 2 Sc) in Ch 2 Sp. Repeat from [ to ] on the opposite side.

Repeat row 2 adding an additional 2 Dc to the Bold number until you reach the size you would like. I repeated this row 4 times. If you would like larger or smaller fins, repeat it more or less times.

Sc around and fasten off leaving enough of a tail to sew fins onto the bottom of tail.        

Dinosaur Spikes:
These were simple 1/2 granny squares that I made using 2 strands of yarn instead of 1 so that they stand up better.

Click here for a pattern on how to crochet 1/2 granny squares. This link includes both a written pattern and charts.


As always have fun with this pattern and feel free to comment with any questions/sugestions/etc.

Stormi


Thursday, May 28, 2015

Modifying Existing Patterns to Fit Your Needs and Style

It's been a while since I've made a new post. Between family and school, I just haven't had the time over the past year. Well, school's out for the summer and I've been looking for ideas. Last night, I sat down to try a pattern I came across on Pinterest and, during a particular frustrating tear out, inspiration struck. 

One of the best things about Crochet is the ability to customize everything you make. It is VERY rare to come across a pattern that cannot be modified in one way or another. 

If you know me, you know that most of the time, I write my own patterns for a lot of the projects I work on. Whether the project is 100% my own, or I've come across something in a store or online and thought to myself "I can totally make that." the process is the same and pattern writing takes time and patience. 

If I come across a pattern I like and the pattern happens to be free, I usually always give it a try. After all, why would I put in all the time and work to make one of my own when someone else is offering up their time and work for free? 

That being said, it is rare that I get all the way through a free pattern without changing something.  Not all patterns you come across online (especially ones that you find for free) are free of errors. In fact, a large percentage of the patterns I come across on line have errors, are written in a way that is difficult for most beginner/intermediate crocheters to understand, or executed in a way that could have been done in a FAR more simple manner. 

The other issue you come across with patterns (whether free or not) is a difficulty in finding a pattern that is exactly what you need/want and that also fits into your personal style. 

Too many beginners are afraid to change up a pattern on their own and they really shouldn't be. As long as you have the basics down and a little bit of imagination, you can modify any pattern to result in something customized exactly the way you want it. 

On to my example:

The pattern I came across on Pinterest was for a zippered pouch.


I highly suggest you give it a try! Aside from one issue I had at the beginning, I think it is a very well written pattern.

The only technical issue I had with the pattern was really about the execution of  round 2 and this was 100% because I felt it could be done in a far simpler way so that's what I did.  If you want to do this pattern and use the more simple way that I did, simply ch 40 like the pattern calls for, work a hdc in the 2nd ch from hook and in each ch to the end. Instead of following the rest of her round 2, simply turn the project and work 1 hdc in the other side of each ch to the other end and join with a slst to the 1st hdc in the round. Then continue with her pattern the way it is written. 

There were a few things I wanted to change about this pattern:
  1. I only had worsted weight cotton (not the DK the pattern calls for) This means that the pattern left the way it is written would have made this pouch HUGE.
  2. I wanted the finished product to be a bit smaller than the one in the original pattern. 
  3. I wanted different colors.
  4. I wanted the color changes to happen twice as often as the pattern calls for.
While the original pattern is FANTASTIC, I still wanted to make these changes so that when I was finished, I had something that fit my needs/style. 

As with any pattern I find online, I gave it a go 100% following the pattern and then decided how to go about customizing it. 

The pictures that follow were that first attempt along with my thoughts on each part:
I think the main thing that really made me fall in love with this pattern was the texture. As you can see, I changed the color scheme right from the start. Color is one of the simplest and most effective way you can customize a pattern. I chose to stick with her original color change intervals (at first) but you could easily do this project in all one color if you want to. 
 This is as far as I went with the first attempt. I could feel that something wasn't quite right and did not see the point of finishing something that was going to be too large for me to use in a practical way. 
 The original pattern has this pouch measuring in at about 9.5 inches wide and as you can see, mine was closer to 11. This was the point I realized that I had made a mistake in regards to the yarn I was using. I read cotton and grabbed the cotton I had. The pattern calls for DK weight yarn which is slightly smaller than the worsted weight I had. Read the materials list on you patterns CLOSELY!
And again, the pattern has the height on this measuring about 6.5 inches and you can see that I'm almost there and I still have a few more sections to go.

So, needless to say, I ripped all of that out and started over. 

Since I wanted the finished project to be smaller than the one in the pattern, instead of chaining 40 like the original pattern calls for, I chained 26. If you are working in DK, you might not want to decrease quite this much as DK is a smaller weight yarn. 

Important: It is really simple to change up the size of a pattern but there are a few things to keep in mind when doing this. 
  • If your project is simple (such as dc in each st across/around) you simply decrease the number of chains/stitches in the foundation row. I
  • f your pattern is a bit more detailed, like this one, you have to take the pattern repeat into account. 
    • Since this pattern is the same two stitches repeated you need to make sure when you decrease this pattern, your foundation chain is an even number. 

The following pictures are of my finished pouch using the modified pattern:

This pouch ended up about 7 inches wide and 5 inches tall. As you can see, Instead of changing colors every 4 rows like the original pattern calls for, I changed colors every 2 rows. I liked the smaller bands of color and it really helped to keep the striped look of this pouch since I was using larger yarn but making a smaller pouch.
This is a great example of how color changes can change the whole look of a project. If I had changed color every row, the white would have faded into the background more and this pouch would have taken on more of a "basket weave" type of pattern.
 This is the opening. Because this was smaller than I had originally planned based on the pattern, I had to cut the zipper shorter to get it to fit.
 I am glad that I made it smaller than the pattern called for because it is the perfect size to hold the small amount of make-up that generally rolls around loose in my purse.  

This pattern was simple to modify, but you can modify patterns for everything from blankets to toys, and purses to clothes. It can be as simple as changing the colors given in the original pattern, the size of the finished product, or adding or removing stripes,

You can also take a pattern of stitches from an existing pattern and use it to make one of your own. I think this stitch pattern would be just as amazing for a blanket as it is for this pouch. 

Don't shy away from thinking outside the pattern. Customizing you patterns is super fun and exciting. I always love the finished product 100 times more when I have changed a little here and a little there to make it 100% my own style. 

Go out and look around for a pattern you can tweak to fit your own needs/style and have loads of fun doing it.

Stay tuned for more blog posts in the near future and as always... 
Happy Crocheting!

Monday, September 23, 2013

Crocodile Stitch Purse

This is the original purse I made this pattern for. It worked up pretty fast after I figured out how the stitch was done. I took it slow and worked on it over two nights, but it could have easily been done in one night.
I tried to write this pattern so that it is easy to customize and make the way you really want it. Have fun making this pattern in different sizes and color combinations!

This was a pattern I made up as I went so please let me know if you have any trouble with it.

Notes:
This pattern is mostly “crocodile stitch.” Once you figure it out, it is really easy. However, beginners to crochet may have difficulty figuring out the stitch from only a written pattern. If you find that you are having trouble, check out this blog ( http://yarn-muse.blogspot.com/2011/01/crocodile-stitch.html ) for a few fantastic videos on exactly how this “stitch” is done. The only difference between what you see in the videos and what you will do in this pattern is that the videos show you how to work the stitch in flat rows while in this pattern you will be working in a circle.

As you progress through each row of this pattern, the “scales” should be off-set from each other. The point of the “scale” in one row should rest between two “scales” of the previous row. If this is not the case, make sure when you start row 4 (and every repeat of row 4) that your first 2 DC (it will read “ch 3, dc in same sp) is worked into the space BETWEEN two “scales” and NOT in the center of a “scale”

Materials:
Worsted weight yarn (The exact amount of yarn needed for this pattern varies based on personal preference for bag and strap sizes.)
Size H/8-5.00MM Crochet hook
Yarn needle
Button if you would like a closure.
4 Stitch markers

Pattern:

1.) Ch 34, (If you would like a larger or smaller bag, simply make the base chain the length you would like for the width of your purse. The only rule is that it MUST be a number divisible by three and THEN add ONE stitch to that number. This extra stitch makes up for the height of the sc you will be working around the chain.) sc in 2nd ch from hook and in each remaining ch. Turn and sc in each ch sp down the other side of the ch, join with a sl st. (66 sc around [If you changed the number of base chains, subtract the one stitch you added and multiply by 2 to get the number of stitches you should have around to start with])

2.) Ch 3(counts as your first dc), Dc in st you joined to. *ch 2, sk 2 sts, 2dc in next st* around. Join with a sl st to 3rd ch of ch3.

3.) Ch 1, (working AROUND the posts of dc from previous row) [5 dc around first dc, ch 1, work 5 dc around next dc]ßThis makes one “scale”. *skip next 2 dc and work 5 dc around next dc, ch 1, 5 dc around next dc* around, join with a sl st to first dc of the first “scale” in the row.

If making this purse with stripes, fasten off and switch colors.

4.) Working through both layers,(If joining a new color: join with a sl st to the space between “scales” and through the 2 skipped dc from previous row.) From this point on, when making the pairs of dc, make sure you are working through both layers of the previous row. Both the space between the scales and the space between the 2 skipped DC from the previous row. Ch 3, dc in same sp, *ch 2, 2 dc in space at center of “scale”, ch 2, 2 dc in space between “scales”* around. Join with a sl st.
Repeat rows 3 and 4 until purse is the desired height.

Fasten off.

The rest of the purse will be worked with two strands of yarn at the same time. If you have been working the pattern in stripes, I would suggest using one strand of both colors. If you used more than two colors, either pick the two colors you think will look best or pick a single color.

5.) Using two strands of yarn, and making sure you are going through both layers of the previous row, join to any stitch with a sl st. Ch 1 and SC around putting 2 SC around each DC, 1 SC between each “scale”, and 1 SC in the center of each “scale.” Join with a sl st to the first sc in the row.

6.) Ch 1, sc in each st around. Join with a sl st and fasten offß ONLY IF YOU ARE GOING TO ADD A LINING. If not, simply join, and move onto row 7.

At this point, you want to decide if you are going to put a lining in your purse. I highly recommend doing this. Due to the way this pattern is worked, it is easy for small things (pens, chapstick, change, lipstick, etc.) to slip through the sides.

To make a lining: Cut two pieces of fabric roughly the same size of your purse. With right sides together, sew around three edges, leaving one side open. LEAVE RIGHT SIDES TOGHETER! Fold the open edge down to create a “hem.” Slip lining into purse and line up the edge of the “hem” with the edge of the purse. Using a sewing machine or by hand, sew the lining to the purse. MAKE SURE YOU DO NOT SEW OVER THE TOPS OF THE STITCHES. You will need to be able to crochet through them to finish the purse.

7.) (If you added a lining, join to any st close to one end with a sl st) Ch 1, sc in each st around. Join with a sl st to first sc or row. If you are adding a button closure this is the row to make the button hole. To do this, in the center of one side, chain 1-3 and skip 1-3 sts depending on the size of your button. (If you use a small button, you may only need to ch 1, sk 1. However, if you use a large button, you may have to ch 3, sk 3.)

8.) Ch 1, sc in each st around. Join with a sl st to first sc of row. If you added a button hole, make sure you sc in the sk st space. (If you chained 1 you will have 1 sc in the space, if you chained two, you will have 2 sc in the space, and so on.)

Now you are going to make the straps. There are a few things you need to decide at this point. 1.) How long do you want the straps? 2.) How close to the center of the bag do you want them to attach? Once you decide where you want the straps attached, place stitch markers at and even distance on both sides of the bag. (You should have 4 stitch markers. Two on each side of the bag.)

9.) Ch 1, sc to the first stitch marker. Ch 20 + (depending on how long you want your straps to be), sc at next stitch marker and in each st to next marker, ch the same amount you chained for the last strap, sc at marker and in each remaining st. Join with a sl st to first sc of row.

10.) Ch1, sc in each st and ch around, join with a sl st. Fasten off and weave in ends.


For Button: Using the button hole you made as a guide, attach button to the INSIDE of the opposite side of bag.

Thursday, August 29, 2013

Crochet Washable Swiffer Sweeper Pad

I love how simple it is to use my Swiffer Sweeper. What I don't love is constantly having to buy new boxes of wet or dry cloths for the thing. I get the appeal of the whole "throw the dirt out with the cloth" thing, but after a while all those cloths add up in cost. When I think about it, I also feel a bit guilty about all the extra waste disposable cloths add to our trash can. So I decided to make my own that are easy on your pocket and better for the planet!

These pads are awesome for other uses as well. They make great washcloths for dishes or other household cleaning and they are AMAZING to use when washing the car. Washable and multipurpose! 


This crochet pad fits the standard Swiffer Sweeper and can be used either dry or wet.


Just press edges into the cloth holders on your Swiffer Sweeper and sweep away. If you want to use it as a wet mop, simply soak in your favored floor cleaner, wring out, and attach to your Swiffer Sweeper. (I also like to use a spray bottle and spray my cleaner on the floor and start with a dry pad. It works just as good as soaking it!)

(Not sure how noticeable it is, but I made a mistake on this one. You can see it in the lower right corner. I missed a puff stitch. Annoying for me, but not the end of the world with something like this. Everyone makes mistakes.)

Materials:
Size H/8-5.00MM Crochet hook
Yarn Needle
Cotton Yarn. (I used 1 ball of Peaches and Cream brand in Bright Pink for the one pictured.)

Puff Stitch: This stitch is also often also called a popcorn stitch. To work this stitch, *YO, ( yarn over) insert hook into st, YO, pull through st* 5 times (Other patterns might use less than 5 for the puff st but this pattern needs the added bulk) YO, pull through all but the last loop on hook, YO pull through both loops on hook.

As you work this pattern you may feel like the pad is going to be slightly too small. As long as you are using cotton yarn and size H hook, I wouldn't worry too much about it. After adding the edge and after the stitches relax a bit it will fit just fine. If you crochet a bit tight or are using a smaller hook, you may have to either use a larger hook or adjust the chain count in Rnd: 1.

Pattern:
Rnd 1: Ch 31, sc in 2nd ch from hook and in each ch across.
Rnd 2-5: Ch 1, turn, sc in each st across.
Rnd 6: Ch 1, turn, sc in next 2 sts, *puff st in next st, sc in next st* across ending with 1 sc in each of the last 3 sts.
Rnd 7: Ch 1, turn, sc in each st across.
Rnd 8: Ch 1, turn sc in next 3 sts, *puff st in next st, sc in next st* across ending with 1 sc in each of the last 2  sts.
Rnd 9: Ch 1, turn, sc in each st across.
Repeat Rows 6-9 three more times.
Rnd 10-12: Ch 1, turn, sc in each st across. DO NOT FASTEN OFF

Edge: Ch 1, turn sc in each st and row around working 3 sc in each corner. Join with a sl st to first sc of edge, fasten off and weave in ends.

Monday, August 12, 2013

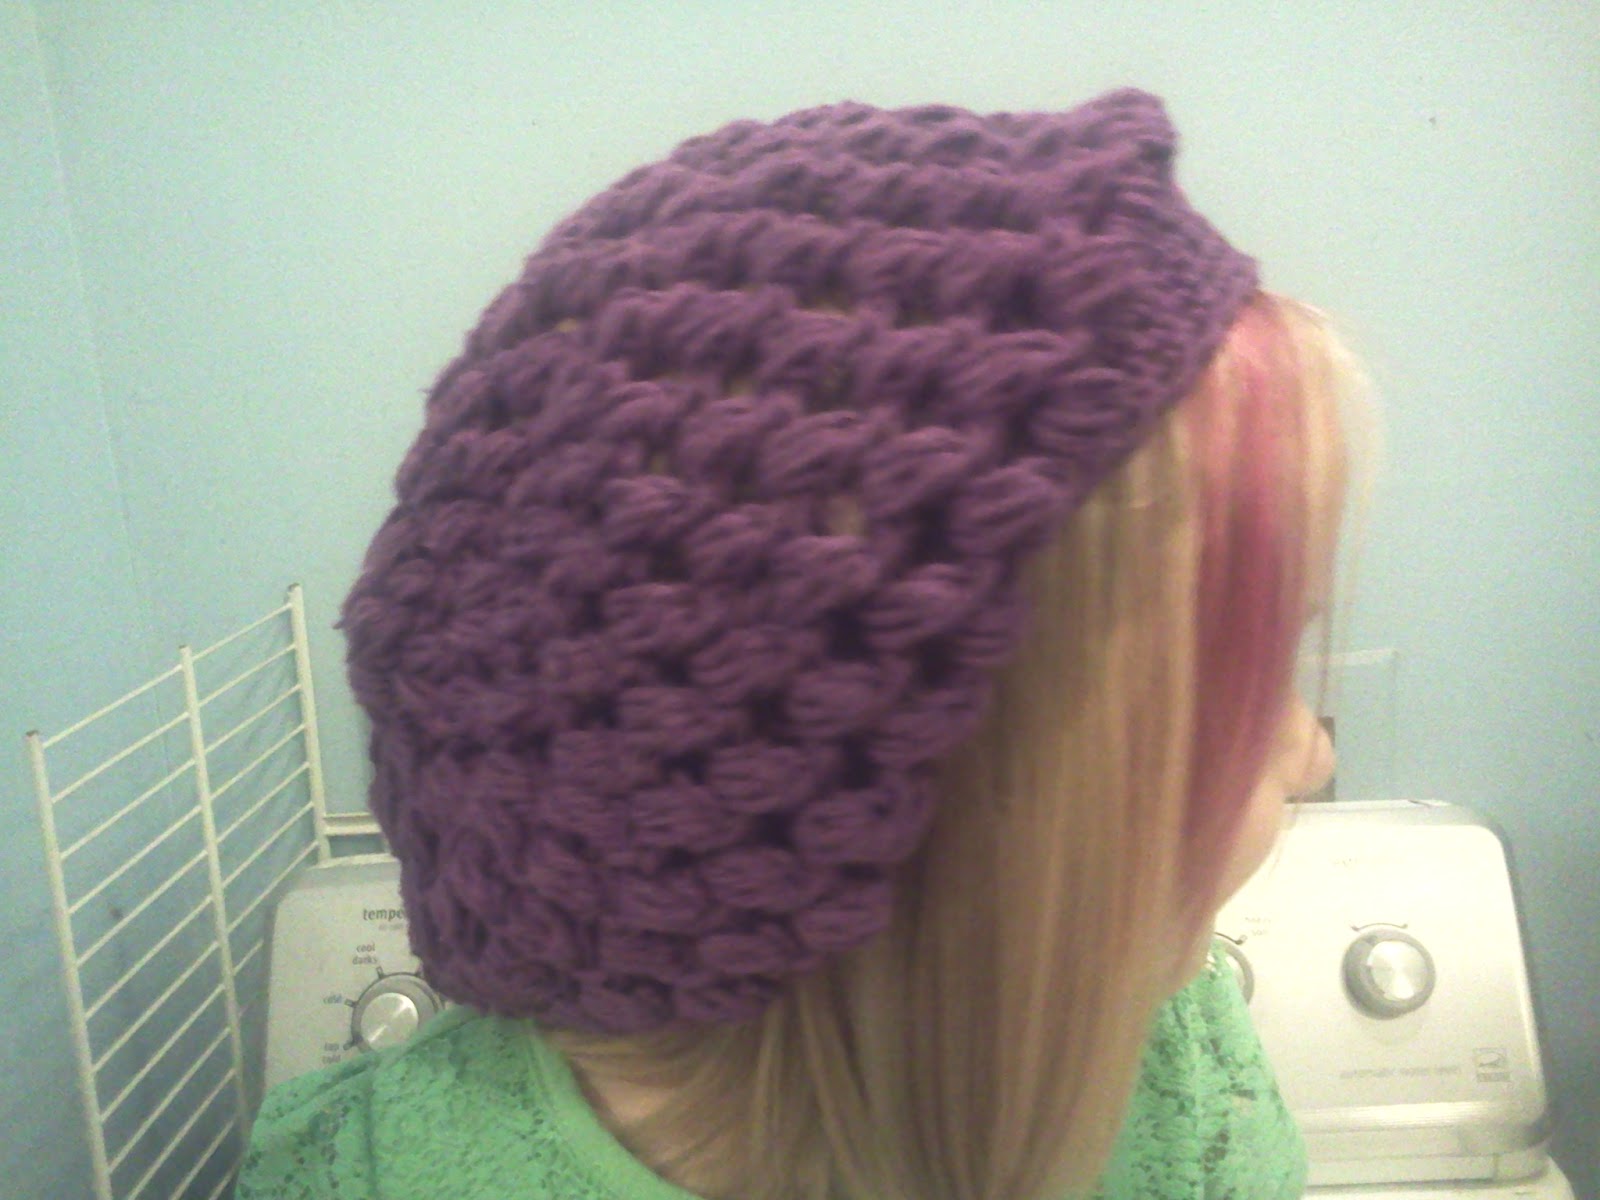
Puff Stitch Slouchy Beanie (Child size pictured. Pattern includes adult size as well.)

Recently I've been looking at hat patterns online. I was looking for inspiration and trying to decide what type of hat I wanted to make. I wanted something fun that would work up fairly quickly. While looking, it didn't take me long to stumble across the blog All About Ami and the Urban Jungle Crochet Slouchy Beanie by: Vickie Howell. 

There were several things I loved about this pattern including the texture of the puff stitch, the wide, flat band, and the loose slouchy style. 

There were, however, a few things I did not like about the pattern.The first thing I didn't like was that the band was worked separately from the main body of the hat. I like the added strength of having them worked together. My main issue with the Urban Jungle pattern is that it is worked in a tube and then you have to "close" the end of the hat. I didn't like the added bulk and generally messy look "closing" the hat creates.

Because of the things I didn't like about this pattern, I decided to write my own with the Urban Jungle Beanie as inspiration. This pattern is worked in rounds starting with the back of the hat instead of the band and using increases to build the "slouch" so that you don't have to "close" the hat at the end. This also takes away some of the added bulk and results in less yarn being used over all. I also worked the band into the pattern instead of having it worked separate from the main body of the hat.

Pictures included are of the child size. Adult size is included in the pattern.

This pattern works up fairly quickly and is easy enough for a beginner to follow. The pattern is worked in such a way that makes it easy to use multiple colors and even work the whole thing in stripes. Have fun experimenting with this one!

This was a quick write up so if you come across any problems or have questions about any part of this pattern, please leave a comment and I will answer as soon as I can.

Enjoy,
Stormi

 My daughter sporting the Slouchy Beanie I just finished.
 I love the texture of the puff stitches in this hat!
 Because of the way I wrote up this pattern, the back looks super neat and has no added bulk.
Cute flower I decided to add to the band of my daughter's hat. It was not originally a part of this pattern, but it looked so cute I decided to include it at the end of this pattern. (Flower looks a little weird in this pic.)


Materials:

Size J-10/6.00MM Crochet Hook

1 1/2 - 2 balls of Peaches & Cream (or similar) 100% cotton, worsted weight yarn. (Color pictured is Black Currant) You can use yarn of a different material (such as Acrylic) however, depending on the material you use and the weight of the yarn, it might change the look and feel of the finished hat. Also, when using other types of yarn keep in mind that changing weights will affect the size of the hat.

Yarn needle

Stitches:
Ch: Chain
Sl St: Slip Stitch
Sc: Single Crochet
Puff: Puff Stitch

To work a puff stitch:
Work (Yo, (yarn over) insert hook into st or space, yo and pull through) 3 times (you should have 7 loops on your hook.) Yo and pull through all but the last loop on the hook. Yo and pull through last two loops.

Pattern:

Rnd 1: Ch 5, join with a slst to the first ch to form a loop. Work (puff st, ch 1) into the loop 6 times. Join with a sl st to the top of the first puff st.

Rnd 2: Work (puff st, ch 1, puff st, ch 1) into each ch 1 space around, join with a sl st to the top of first puff st.

Rnd 3: *puff st, ch 1 in next st, (puff st, ch 1, puff st, ch 1) in next st* Rep from *to* around. Join with a sl st to the top of first puff st.

Rnd 4: *puff st, ch 1 in next 2 sts, (puff st, ch 1, puff st, ch 1) in next st* Rep from *to* around. Join with a sl st to the top of first puff st.

Rnd 5: *puff st, ch 1 in next 3 sts, (puff st, ch 1, puff st, ch 1) in next st* Rep from *to* around. Join with a sl st to the top of first puff st.

If you would like to make a child sized hat, after finishing Rnd 5, skip ahead to Rnds 8-14.

Rnd 6: *puff st, ch 1 into next 4 sts, (puff st, ch 1, puff st, ch 1) in next st* Rep from *to* around. Join with a sl st to the top of first puff st.

Rnd 7: *puff st, ch 1 into next 5 sts, (puff st, ch 1, puff st, ch 1) in next st* Rep from *to* around. Join with a sl st to the top of first puff st.

If you would like your hat to be wider/puffier add another row or two of increases here. ( “into next 6 sts… into next 7 sts…” ect) Keep in mind that adding increase rows will also add to the size of the finished opening of the hat. You may have to add decrease rows to make the hat fit your head. (I will get into that later when you will need to know how to do them.)

Rnds 8-14 : *puff st, ch 1 into next st* repeat from *to* around. Join with a sl st to the top of first puff st.

If you would like your hat to be longer add another few rows here before you move onto the band of single crochets.

Rnd 15: Ch 1, sc in each ch 1 sp around and join with a sl st to the first sc in the row. (You want to make the stitches in this row a bit tight. Because of the wide space between them, they will want to pull a little loose. If you keep these stitches tight then you will have to do fewer/no decrease stitches to make the hat fit your head.)

Rnds 16-21 : Ch 1, sc in each st around and join with a sl st to the first sc in the row. After last row fasten off and weave in ends.

If you added increase rows to make your hat wider/puffier or if you need to make the opening of the hat smaller to fit your head or the head of a child, you will need to replace one or more of Rnds 16-21 with decrease rows.  

To do a decrease row, you will want to sc in each stitch around while evenly spacing 6 sets of (sc 2 tog) This is pretty much the opposite of the increase row. For example, instead of working *sc into the next 5 sts, 2 sc in the next st* you will work *sc into the next 5 sts, sc 2 tog*.

Sc 2 tog: insert hook into next st, yo and pull through st, insert hook into next st, yo and pull through st, yo and pull through both loops on hook. This basically turns two sts into one in the next row.

Don't worry if you need to add one or more single crochet decrease rows to the band. I think this hat also looks great with a wider band.

Flower: (Not necessary but it looks super cute for children hats.)
Ch 5, sl st into first ch to form a loop.

Ch 1, sc in loop, ch 3, *sc into loop, ch 3* repeat from *to* until you have 5 "Petal Loops" join with a sl st into first sc.

Work *sc, hdc, dc, tr, dc, hdc, sc* into each "petal loop" to form the petals of the flower, join with a sl st to the first sc, fasten off leaving a tail long enough to sew on flower.

Using yarn needle, place the flower on the band. I like to place the flower over "seam" in the band made by joining the ends of rows.

Thursday, May 9, 2013

It's a Crochet Bow Tie - I Crochet Bow Ties Now - Bow Ties Are Cool!


I spent about an hour looking for crochet bow tie patterns online and found none that I liked. Every pattern I could find used yarn and I really don't like the way they look in the end. So at the end of the hour, I decided to write up a pattern of my own using thread instead for a more tight and classy look.


Materials:
Size 10 Crochet Thread (See below for type) 
Size 7 / 1.65mm crochet hook
Needle for weaving in ends
Starch (If you want to starch the ends. I recommend it.)

I have had several questions about the type of thread used for this pattern. The "thread" needed is NOT the kind you would use for sewing or embroidering. You need crochet thread. This is the kind of thread you will usually see used to crochet doilies or lace-type tablecloths. I usually use the Red Heart Classic Crochet Thread you can find at nearly any Walmart (as my town lacks anywhere else to buy yarn, thread, etc.). You can usually find it close to where most stores stock their yarn. At Walmart it is usually on the same isle as the yarn. In other stores like, Hobby Lobby or Joann's, they usually stock it on the end of an isle. No matter what brand you end up buying, they will all look similar to the pic below.

Terms:
·         Decrease Row: Ch 1, turn, sc 2 tog, sc in next st and in each st across
·         Increase Row: Ch 1, turn, 2 sc in first st, sc in next st and in each st across


Pattern: [Main pattern makes a large "Bow" when tied. For a smaller sized "Bow" use stitch numbers inside ( ) In rows where you do increases and decreases, you will end up doing 5 less rows then the pattern says for the smaller sized "Bow" ]


1.                                           Ch 21(16), turn sc in 2nd ch from hook and in each ch across. (20 (15) sts)

2-4.                  Ch 1, turn, sc in each st across.

5-19.                Decreased rows. (Last row will have 5 sts.)

20.                   Ch 1, turn, sc in each st across.

21-35.              Increase Rows (Last row will have 20 (15) sts.)

36-43.              Ch 1, turn, sc in each st across.

44-58.              Decrease rows. (Last row will have 5 sts.)

59-203.            Ch 1, turn, sc in each st across. (If you need this bow tie to fit larger or smaller neck sizes, simply add or leave off rows from this section)

204-217.          Increase rows (Last row will have 20 (15) sts.)

218-225.          Ch 1, turn, sc in each st across.

226-240.          Decrease rows (last row will have 5 sts)

241-242.          Ch 1, turn, sc in each st across.

243-257.          Increase Rows (last row will have 20 (15) sts)

258-261.          Ch 1, turn, sc in each st across.

262.                 Without turning, sc in each st around the outside of bow tie. Join with a sl st to first st of previous row. Fasten off and weave in ends.


It is a good idea to starch the ends of the bow tie to get it to stand up right when you tie it. If you do not starch it, it has a softer, floppy sort of look and the ends will curl over on themselves a bit. 

This pattern works up fairly quickly considering the small size of thread. I think it took me about 2.5 hours and that was with me typing out the pattern as I went.

Have fun with this one! This pattern can easily be adapted to use more than one color. (stripes, outside border a different color, etc.) I would love to hear how the pattern works for you and as always feel free to comment with any questions you have. 

Stormi